• Skip to primary navigation
  • Skip to main content
  • Skip to primary sidebar
  • Home
  • About
  • Contact
  • Privacy Policy
  • Disclosure
  • Terms of Service
  • Nav Social Menu

    • Email
    • Facebook
    • Instagram
    • Pinterest

The Diary of a Northern Belle

Hand Embroidery

  • Stitch Library
  • Learn Embroidery
    • All posts
    • For Beginners
    • Stitch tutorials
    • Tutorials & How-To’s
    • Join a stitch along
    • Book Reviews
  • English Paper Piecing
  • Kits & Patterns
    • PDF Patterns
    • DIY Kits
    • Botanical Wreaths
  • Stitch Along
  • Blog
  • Freebies
  • Shop

THE LATEST

Floral Garden Bunting Project: a Wrap-Up on the 2023 Stitch-Along

Fall Floral Embroidery Pattern: Calendula Wreath

“Embroideries From an English Garden” by Carol Andrews โ€“ Book Review

Learn Embroidery

FREE Embroidery Pattern & Tutorial: Wisteria Branch

June 12, 2021      Anne      4 Comments

Whoโ€™s ready for a hand embroidery pattern freebie? ๐Ÿ™‚


embroidery freebie wisteria

Read on to download this sweet wisteria embroidery pattern & see the tutorial. ๐Ÿ™‚ Last week, I introduced you to one of my new favourite novels, The Enchanted April, by Elizabeth von Arnim. We talked about how dreamy and escapist it was, and how much flower inspiration there was to be found in it. The wisteria in particular, proved to be a wonderful subject for embroidery!


If you havenโ€™t seen that post, check it out here.


I showed you a bit of how I embroidered my wisteria-inspired project, and if you liked it then the good news is that I have more wisteria for you this week!


embroidered wisteria branch finished side view
embroidered wisteria branch finished view from top


I created this pattern so I could share my newfound love of wisteria with you all. Now you can stitch your own! May it bring you sunshine and happiness as promised in The Enchanted April.


The pattern is super simple and accessible to beginners. I only used three basic stitches: the split stitch, the lazy-daisy stitch, and a form of leaf stitch. Simply click on any of these for a full tutorial on how to work them.


See also: The Only Embroidery Tools You Really Need to know which basic materials you will need for this project.


DOWNLOAD YOUR PDF HERE: Wisteria Free Embroidery PatternDownload


Tutorial:


I used DMC floss, but you can use another brand if you like. You can find a good conversion chart here. I used 2 strands throughout the whole project.


#153 (Vy Lt. Violet)

#210 (Md. Lavender)

#470 (Lt. Avocado Green)

#553 (Violet)

#3011 (Dk. Khaki Green)

#3042 (Lt. Antique Violet)


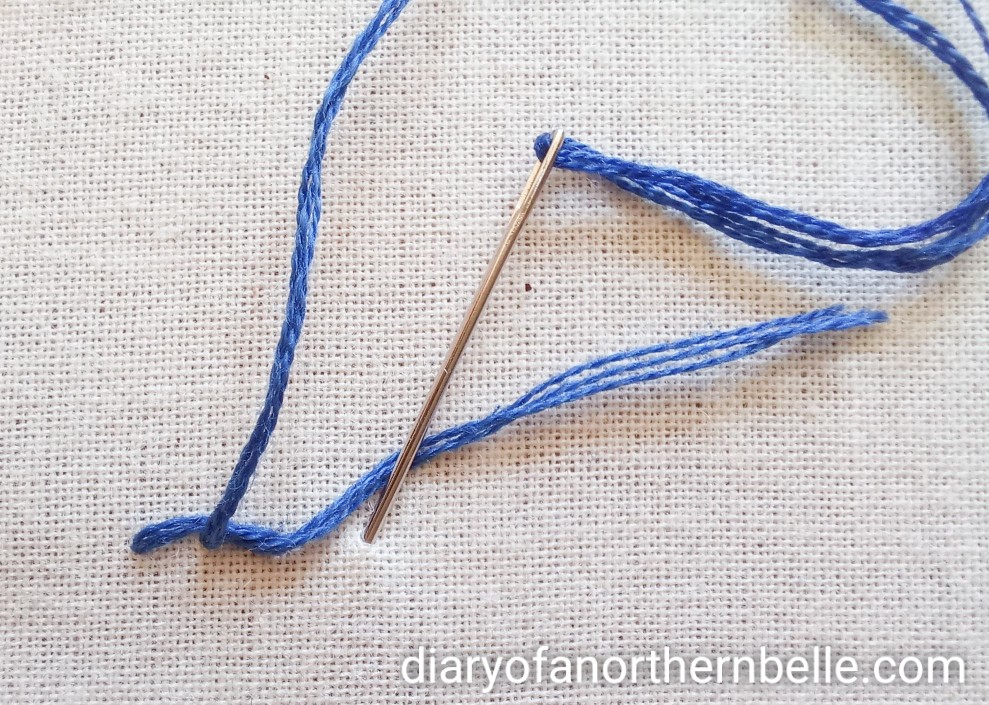
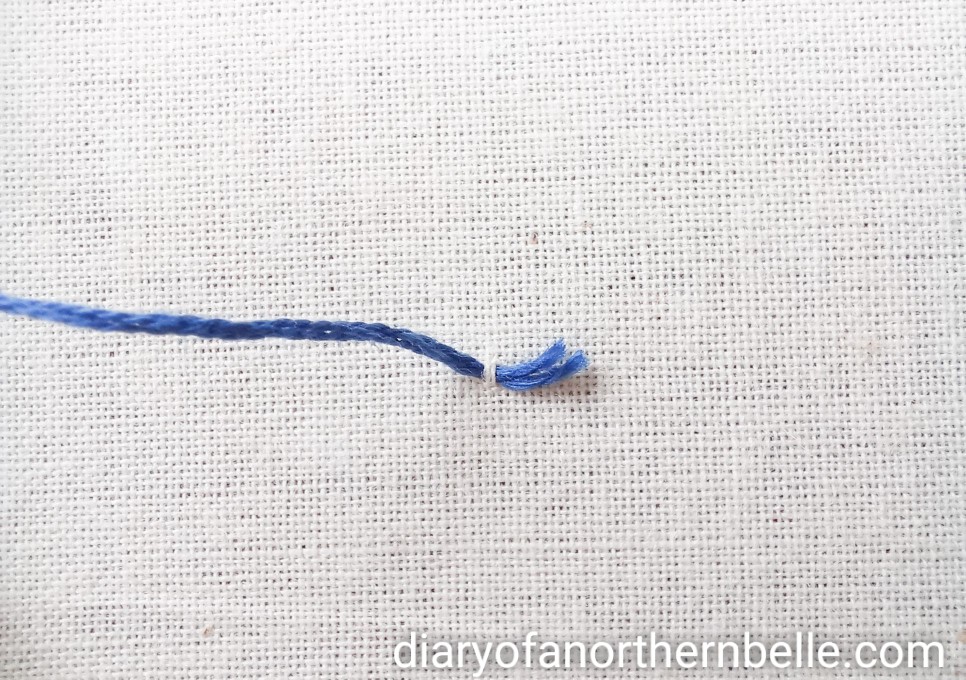
See also this post on How to Start & End Your Stitches.


1. Branches


Begin by stitching the branches (or stems?) with #470 . Since the leaves and the flowers will go over it, itโ€™s easier to start with it first. I used the split stitch, but feel free to use any other outline stitch that you like, such as the backstitch or the stem stitch. Stitch all the way down the middle of the flower cluster. Some of it will show through once the flowers are stitched. You can also stop the branch before the cluster if you donโ€™t want it showing through or you want to make your flowers very tight together.


wisteria stem in split stitch


2. Leaves


There are many ways to embroider leaves, but I kept it super simple here and just stitched mine with a simple leaf stitch. The method I use is kind of a cross between satin stitch and fishbone stitch. Using 2 strands of #470, make a small straight stitch from the top of the leaf to the top of the guideline running down the middle vein.


leaf worked in straight stitches


Work your way down the leaf by starting your stitches on the outline of the leaf and ending on the middle guideline for the central vein. Make your stitches at a diagonal angle to keep the shape of the leaf. I like to work one side at a time (usually I start with the right).


leaf worked in straight stitches one side at a time


If youโ€™re satisfied with the look of the leaves as they are after this step, you can skip the next step! I just wanted to add a bit more colour and texture to mine.


Using #3011, make a straight stitch down the middle of the leaf for the main vein. I also added two very small stitches on either side, also on a slight angle.


view of finished leaves


3. The Flowers


The flowers are all worked in lazy-daisy stitches, sort of scattered in a downward motion and fairly close together to create the droopy cluster effect. On your pattern, the dotted line indicates the shape the finished cluster will take. You don’t have to transfer that line on your fabric as it may leave marks if it’s not entirely covered in stitches. It’s more just to give you an idea of the finished size and shape. You can transfer the straight lines going down from the stem, as those should be all covered and will help you to guide the placement of your stitches.


You want to work your lazy-daisies downward, some going straight down, and others going at slight angles from the branch. There is no specific placement for each of them though, and this is a very forgiving flower for embroidery. One stitch or two out of place will only add shape to it! Have fun with it and experiment with where you place your stitches if you want to change the shape a bit, or the way it hangs.


lazy-daisy stitches embroidered along wisteria branch to create flowers
wisteria branch being filled with lazy-daisy stitches to create the flowers


I used #153, #3042 and #210 for the smaller branch, and #153, #3042 and #553 for the bigger one.


finished embroidery work


And there you go! I decided to add a little bow at the last minute to give it a more finished look. I used a piece of narrow white satin ribbon, tied it into a bow and sewed it to the base of the branch.


view of little white ribbon bow at base of wisteria branch


It looks pretty cute I think! I really hope you have fun stitching this wisteria pattern. This is the first “real” pattern I’ve ever made so I’m pretty excited. Any feedback will be super appreciated and I would love it if you show me your results! Tag me on Instagram @northernbelle.atelier if you try this wisteria pattern! ๐Ÿ™‚ Also don’t hesitate to reach out for any questions or comments and be sure to subscribe to my newsletter for more embroidery content!


Fondly,

wisteria embroidery free pattern
Pin to save for later!

Easy Chain Stitch Tutorial

May 28, 2021      Anne      Leave a Comment

Whoโ€™s ready to learn more stitches with me? Today, I’ve put together a tutorial on how to do the chain stitch and the detached chain stitch (commonly known as the lazy-daisy stitch). I absolutely love the lazy-daisy and use it all the time. So I’m excited to share it with you! Back in March, I wrote a post on the first 5 stitches you should learn as a beginner, and I definitely encourage you to have a look at it to learn the basics. Today’s tutorial also features an easy stitch, perfect for beginners and widely used in surface embroidery. So grab your needle and thread & letโ€™s go! For a list of all the materials you need to get started with embroidery, check out this post.


chain stitch easy embroidery tutorial


First things first, youโ€™ll need to cut some embroidery floss, about the length of your forearm. I will be using 3 strands of DMC #3818 throughout this tutorial, but feel free to use more (or less). Then, thread your needle and either knot the end of your thread or anchor it to the fabric using any of the methods detailed in this post (or any other way you know of starting embroidery)


The Chain Stitch


Iโ€™ll be honest, I really donโ€™t use this stitch very often. I usually kinda forget about it. I really like it though, and itโ€™s super easy. It just never seems to work with anything Iโ€™m stitching for some reason haha!


To begin, bring your threaded needle up from the back at point A. Pull the thread all the way through.


thread pulled all the way through at point A to begin chain stitch


Go back down in the same hole (A), and bring the needle up at point B in the same swoop. Donโ€™t pull all the way.


needle going back down at point A
needle going back down in A and up in B


Pull the needle through gently, pulling until the thread forms a loop. Bring your needle through that loop, and pull through.


needle being pulled through point B
Pull the needle through until you get a loop big enough to go through it.
thread going through the loop to form chain stitch
Bring your needle through the loop.
loop being pulled down
Since point B is below point A, the loop will eventually be pulled down to lay where it’s meant to.


Sometimes you might need your other hand or the tip of your needle to help guide the loop, as it can have a tendency to twist and wonโ€™t lay properly.


first chain of the chain stitch complete
Pull the thread trough the loop until it rests nicely on the fabric.

Go back down into the same hole again, where your thread currently is (point B), and bring your needle up at point C. This is the same motion as before, when you started your first stitch.


needle going back through point B and up at point C
Go down B and up C before pulling the needle through.

Pull the needle and thread through until you get a loop of thread, just like in the previous steps. Make the sure the needle goes through and then pull all the way so the loop will lay flat.


second chain stitch being pulled through
two connected chain stitches laying flat


Keep repeating these steps until you have the chain length you want! Basically, you always go back down in the same hole you came up.


chain stitch in progress


To end the chain, simply take a small stitch on the outside of the loop to close it.


closing the last stitch


view of the last closed chain stitch

And there you go, that’s the chain stitch!


The Detached Chain or Lazy-Daisy Stitch


If I never use the chain stitch, I most certainly always use its detached version ๐Ÿ˜‰. As you might have guessed, this is essentially a single link of the chain stitch. Itโ€™s commonly referred to as the lazy-daisy stitch, and will seem super simple after working the chain stitch!


Begin the same way as above. Bring your needle up from the back at point A. Go back down through A and up in B, pulling until you form a loop. Thread your needle through that loop and pull.


needle going down in A and back up in B
needle going through loop
thread being pulled through loop for chain stitch


Pull the loop down until it lays nice and flat.


loop being pulled down to lay flat
chain loop laying flat on the fabric


So far, thatโ€™s exactly the same as the chain stitch. If you wanted to continue the chain, then youโ€™d go back down in the same hole again and keep going until you got the length you wanted.


But for the lazy-daisy, all you need to do is end the stitch there, as though you were finishing the chain length.


Take a small stitch on the outside of the loop to secure it.


small stitch on the outside of the loop to hold chain stitch down


And thatโ€™s it!


finished detached chain stitch


I canโ€™t tell you how much I love that stitch. Itโ€™s so incredibly useful for leaves and flower petals. Plus itโ€™s pretty quick to work!


I hope this tutorial was helpful to you and that you’ll enjoy working the chain stitch and its detached version. I tell you, the lazy-daisy can be such a lifesaver! I used it a lot in my Redwork Embroidery Box Project, and generally love it for small flowers and leaves.


the lazy-daisy stitch embroidery tutorial


Let me know if you have any more questions about it in the comments, or feel free to share the love for this stitch too ๐Ÿ™‚


Fondly,

9 Reasons to Learn Hand Embroidery

May 21, 2021      Anne      2 Comments

Have you been thinking about starting to learn hand embroidery but youโ€™re not too sure whatโ€™s in it for you? How easy it is to get started? Is it worth your time and money? Read on to discover 9 reasons why you definitely should give it a try! Iโ€™m biased, but embroidery is wonderful!! Hereโ€™s why:


1. Itโ€™s Inexpensive


Unlike other hobbies – like sewing – you donโ€™t need a whole lot of fancy equipment and tools to get started. Embroidery floss is relatively cheap (here in Canada it usually sells for about 0.85-1.05$/skein) and so are embroidery needles. If youโ€™re just getting started and testing things out, you can practice stitches on any cotton or linen scraps if you have any. Cotton and linen are the most common fabrics used for surface embroidery because they are the most forgiving and the easiest to stitch on, but any fabric can be embroidered on. When I started, my first project was on a cheap piece of Dollar store felt, and it worked just fine (well, my technique was awful, but the working of the needle itself was fine lol).


See also: The Only Embroidery Tools You Need


starting hand embroidery, strawberry needlepainting with dried leaves


2. It’s Easy


As with any hobby, getting started can often be pretty intimidating. Itโ€™s hard to know exactly how and where to start, and you might feel overwhelmed by all the existing embroideries and projects you come across. There are definitely some complicated and intense patterns out there, but getting started doesnโ€™t have to be difficult. I am a firm believer than anyone who wants to learn embroidery can do it. Your needle and thread do the hard work, all you have to do is guide them. I remember being intimidated by embroidery when I first started because I absolutely cannot draw to save my life, and thought my needlework would reflect my poor drawing skills. But everything looks much better once itโ€™s stitched! And there are thousands of already existing patterns out there if you donโ€™t want to draw your own.


getting the hand embroidery project started, winded floss surrounds hooped fabric
starting a hand embroidery project, needlepainted strawberry

The basic embroidery techniques arenโ€™t difficult, and you donโ€™t need to learn all the fancy techniques right away to achieve beautiful results. Check out this post on the 5 first stitches to learn to get started!


3. It’s Relaxing


There is something incredibly soothing about hand embroidery. The unhurried motions, the satisfying โ€œswooshโ€ sound of thread going through fabric, the repetitive motionsโ€ฆEmbroidery is calm, peaceful, and frees up your mind to meditate and relax while keeping your hands busy. Setting up is easy too, and you can work as little or as much as you want in a day!


4. You Can Do It Anywhere


Because there are so few materials required when you start embroidery, you can easily embroider from basically anywhere. Whether thatโ€™s your couch, your patio table, in public transit, on holiday, by the poolside, on top of a mountain, you name it! Of course not every project will be suitable for easy transportation and some projects might require being kept in the same tidy spot, but generally speaking, itโ€™s very convenient to bring needlework along with you. I am personally a big fan of outdoor stitching. I love taking my projects to the local public garden and surround myself with flowers.


strawberry hoop art and strawberry bone china teacup


5. Itโ€™s a Perfect Excuse for Binge-Watching


I donโ€™t know which justifies which for me at this pointโ€ฆthe need to stitch the minute I sit down to watch something, or the urge to put on โ€œa background showโ€ when Iโ€™m stitching? A bit of both, I think. ๐Ÿ˜‰ One of my favourite aspects of embroidery is how easily multi-taskable it is. It just becomes something to occupy your hands and feel productive while performing another relaxing activity like listening to music or binge-watching your favourite show.


embroidery snips and hooped fabric rest on pile of Jane Austen dvds


6. Itโ€™s So Creative!


You can literally embroider anything in existence! I tend to stick to florals and other nature inspired subjects, but really anything can be reproduced with a needle and thread. There are so many ways to gather inspiration for projects. It can be a line from your favourite novel, a beautiful design on a teacup, or the potted plant hanging above your kitchen sink. Inspiration is everywhere, from nature to books, movies, video games, history, the skyโ€™s the limit!


7. You Can Easily Adapt it to Your Own Style


Once you find what you like to embroider best and what needlework style suits you, itโ€™s easy to add embroidered touches anywhere youโ€™d like to make something more โ€œyouโ€. You can add it to clothing to make it truly unique, or to other household items, like a pillowcase or a bag. Embroidery is addictive, and once you start, youโ€™ll want to add it everywhere!


get started with hand embroidery! strawberry hoop art, needlepainting


8. It Makes Great Handmade Gifts


Similarly, since there are so many different things you can embroider, the possibilities for making wonderful handmade gifts are endless. Again, you can add it to every day items made of fabric to give them a personalized touch, or simply gift it as art. Itโ€™s hard to go wrong with embroidered wall art, and you can even leave the finished piece in the hoop and use it as a frame. Plus, the satisfaction and pride of gifting something handmade are totally worth the time spent on the piece!


9. You Can Learn a Lot of History


Not only will you be learning a new craft and new skills, but there is also so much fascinating history to learn regarding embroidery. Itโ€™s been around forever, in so many different forms and styles! Did you know that in many cultures, it was often used to differentiate between social classes? Or that the famous technique of โ€œneedlepaintingโ€ became popular during the Victorian era to elevate embroidery to the same level as art? And okay, maybe you arenโ€™t a history nerd like me and are more interested in modern embroidery. Thatโ€™s fine too, thereโ€™s plenty to learn there as well! And if you ARE a nerd like me, well! Youโ€™re in the right spot, because there are so many wonderful resources for learning historical embroidery techniques and I aim to share as many as I can with you!


My current WIP! Needlepainted strawberry done in long & short stitch


Check out how I made this practice stitch book using historical & vintage techniques and patterns!


And thatโ€™s it! Those are only 9 of many more reasons to learn hand embroidery if youโ€™ve been thinking about it. ๐Ÿ˜Š I hope this motivates you to pick up a needle! I will be adding more useful resources on my blog very soon. If you do decide to learn embroidery, Iโ€™d love to know how it goes for you.


Happy stitching my friends!

Fondly,

learn hand embroidery 9 reasons why
Pin to save for later!

How to Start and End Embroidery Stitches

April 19, 2021      Anne      14 Comments

To knot or not to knot, that is a question that often seems to be heavily disputed in the embroidery world! One of the first things you want to know when you first begin embroidery is, of course, how to even begin. What are the proper ways to start and end your embroidery stitches? How do you secure your thread?

This post will answer all your questions about starting and ending off your stitches efficiently. I will go through a few different ways to do so, since certain stitches might require different methods.

Letโ€™s begin with the famous question of whether or not itโ€™s proper to start embroidery by knotting your threadโ€ฆ


To Knot or Not

When I first started learning embroidery a few years ago, I primarily turned to books to teach myself how to stitch. Most authors whose books I thoroughly enjoyed frowned heavily on the practice of using knots. But then again, others saw nothing wrong with it and told you to just go ahead and secure your threads with knots if thatโ€™s what your heart desired. After all, when all is said and done, no one looks at the back of embroidery, right? Whoโ€™s to know or care?


The Case For Knots

The truth is, it really depends on what youโ€™re embroidering and what purpose the final piece will serve. Generally speaking, knots are less secure than the other methods Iโ€™m about to show you. They come undone easier, and if your piece is going to be washed repeatedly, you run the risk of having your beautiful stitches come undone.

They also add unnecessary bulk, and if you like the back of your embroidery clean, they make everything look messier. However. Sometimes a knot is just easier and makes sense. Sometimes you want to go a little faster, and sometimes you might get a little lazier. Iโ€™ll be the first to admit that I do that ๐Ÿ˜‰

If youโ€™re just practicing your stitches on a fabric scrap, or you know your piece will stay in the hoop and the back will be finished with another piece of fabric, then I really canโ€™t blame you for wanting to use knots. I think they’re perfectly acceptable in certain cases, especially if you’re framing your final work.


How to Start With a Good Old-Fashioned Knot:

Begin by gathering the materials you will need for embroidery – you can find more information on that in this post. Prepare a piece of fabric and mount it in your embroidery hoop. Then, thread an embroidery needle. I used 3 strands of navy Anchor cotton floss for this tutorial.

Leave a tail of 3โ€-4โ€ hanging from the eye of the needle (the eye is the hole where you thread).


threaded needle with hanging tail 3-4 inches long


Form a knot at the end of your main length of floss (not the tail). Pull to tighten, and snip off any excess thread.

thread end forming a knot
tight knot at the end of thread

Bring your needle up from the back of your hoop at the point where you want to start stitching. The knot will remain at the back of your work.


How to Start Embroidery Stitches Without a Knot

In the interest of showing you the โ€œproperโ€ way to start and end embroidery stitches for those pieces where knots at the back arenโ€™t your best bet, here are some alternative ways to get started:


1. The Waste Knot

For this one, you will actually begin with a knot again, following the same instructions as above. However, instead of bringing your needle up from the back, you will do the opposite. Draw the needle from the good side of the fabric so that the knot rests on the front.


waste knot resting on the front of the embroidery work


Make sure that the knot is away from where you want your first stitch to be. If you have a guideline marked on your fabric, you want the knot to be slightly away from it, not on it.

Make two very small stitches along your guideline, in the spot where you want your first stitch to be. They should be small enough so that your first stitch will entirely cover them.


two small anchoring stitches to begin embroidery, away from a waste knot


Bring your needle up from the back just behind the first tiny stitch, and make your first actual stitch. For this tutorial, Iโ€™m doing a simple line of backstitch.

needle coming up behind two anchoring stitches to begin a line of stitching
needle coming down to cover anchoring stitches
first stitch laying on top of anchoring stitches, covering them completely


Take a few more stitches, and once you feel that it is secure, go ahead and snip the knot. Lift it gently with one hand and cut with the other.

line of backstitch with waste knot at the end
snips about to cut waste knot

The front is now all neat and tidy and you can carry on stitching!

view of neat front after waste knot has been snipped


Note: You donโ€™t want to place the knot too far from your intended line of stitching, or youโ€™ll end up with a dangling tail on the backside.


How To End Your Stitches Without a Knot

To finish off a line of stitching, simply flip your hoop to work on the backside. Run your needle just behind the stitches youโ€™ve already lain. I usually weave it three or four times before snipping the end.

needle weaving through back stitches to secure end thread
end thread has been secured through stitches on the back ready to snip
neat view of the back once thread has been secured

And there you go! Nice and secure, no bulky knots!


2. Starting with a Long Tail

Certain stitches make it easier than others to forgo knots altogether. With this method, you start by bringing your needle up from the back, leaving a good tail of around 1โ€-1 ยฝโ€ long at the back.


long tail at the back of embroidery hoop


The idea with this one is to catch the tail as you go along. Hold on to it with one hand as you take your first stitch so it wonโ€™t slip away. The next time you come up from the back, as you take your second stitch, make sure to catch the tail underneath it. As you pull your thread tight to lay the stitch, it will start securing the tail.


view of backside, as stitch begins to anchor the tail
View of back
view of backside showing stitch being pulled tight to secure tail
View of back

Repeat these steps a few more time to ensure the tail is really anchored, checking the back of your work to make sure youโ€™re catching it.

more stitches anchoring the tail on the back side
Working on the back, make sure to trap the tail as you lay your stitches.


If you left a pretty long tail, you can eventually just snip it off once you feel it is secure, or you can keep catching it at the back until it is fully anchored.

back view showing anchored tail has been snipped off
View of back


Front will look all nice and tidy ๐Ÿ˜Š

front view of tidy row of backstitch

Finish off the same way as illustrated in the waste knot method, by weaving the thread through the stitches on the back.


3. Starting With Anchoring Stitches


Alternatively, you can also make a few anchoring stitches to secure the thread when you start instead of catching the tail behind your first few stitches.

tail of thread on the back side
Tail on the back side
two small anchoring stitches on front side
Anchoring stitches on the front
back side view after taking two anchoring stitches, shows thread tail hanging loosely
Back side, after anchoring stitches are made

As shown before, cover the anchoring stitches with your first stitch. Continue stitching, catching the tail if you want, or snipping it if you feel it is secure enough.

needle coming up to cover anchoring stitches
Front
First stitch covering the two anchoring stitches, view of front
Front
View of the back, showing snipped tail once it's been secured
Back side, after more stitches were made. Tail has been snipped.

Finish the thread by weaving it behind the stitches on the back, the same way as before.


4. Anchoring “X” Method

This method is probably the fastest and easiest way to start embroidery, but it can end up leaving visible anchoring stitches on the front. Itโ€™s better suited for larger stitches or if youโ€™re filling an area.

Working on the backside of the hoop, take a teeny-tiny stitch where you want your first stitch to lay, or inside a shape you will be filling. Catch only a fiber or two of the main fabric. Pull through, but not all the way. You want to leave a very small tail, only a few millimeters long.


needle on the back side picking up two thread of main fabric
Small tail left on the back side once first anchoring stitch has been made

Going back to the wrong side, take another tiny stitch just behind the first one, at an angle to form a little cross or an X.

on the back side, needle coming behind first anchoring stitch to make second anchoring stitch to form X with the first one


This is what it will look like on the front. It is a bit larger and can be harder to disguise with outline stitches, but itโ€™s perfect for filling and for certain isolated stitches like French knots and lazy-daisy.

view of the front with small X formed by anchoring stitches


Here Iโ€™ve worked some French knots, and the first one sits right on top of that little anchoring cross, completely hiding it.

french knot sits on top of anchoring X
group of french knots worked on good side

How to End Your Stitches

Since French knots are often isolated, this method works really well to secure them. To finish off the thread, flip to the backside, and weave your needle a few times among the stitches.

backside showing dragged thread from french knots
needle running behind the stitches to secure the thread

You can see that I dragged my thread across a little, and while this isnโ€™t always recommended, itโ€™s perfectly fine for working isolated stitches that are still close to each other. Since the threads are a bit loose though, I recommend looping your needle through your working thread to make it extra secure. I also like to run the needle behind the back stitches once more before snipping off.

needle going through thread loop to form small anchoring knot
knot has been pulled tight to secure thread

It technically counts as a knot, but it gives me peace of mind that the stitches wonโ€™t come undone. You could also end the same way you began, with the little X, but make sure that itโ€™s not visible on the good side. This can be tricky sometimes, depending on what stitch youโ€™re working.


Best Way to Start & End Stitches if You’re Filling a Shape

I find it much easier to start embroidery if Iโ€™m covering an area rather than outlining, because any anchoring stitches/tails are sure to be hidden and extra secure.

 To begin, you can either use the waste knot or the hanging tail method. You’ll want the waste knot or the thread tail to be inside the shape. When you place your two anchoring stitches, they donโ€™t have to be as close together as Iโ€™ve shown before. As long as they are inside the shape youโ€™ll be filling, youโ€™re good! They can also be bigger since they will be fully covered.


Iโ€™m using the waste knot method here, and after working a few long and short stitches, I just snip off the knot.

Long & short stitches being worked inside the shape to cover the anchoring stitches
Waste knot has been snipped off the good side of fabric

When youโ€™re ready to end, flip to the back of your hoop, and simply run the needle through a few stitches. If youโ€™re working long & short or satin stitches, they will be nice and tight and your thread end wonโ€™t be going anywhere anytime soon (unpicking these stitches is the worst, they are so secure!).

needle running behind stitches on the back side


If youโ€™re switching colours or simply re-threading, you can begin again the same way you ended. Flipping to the back side, run your needle behind the stitches once or twice, until you can safely pull without the tail coming undone.

Repeat until your shape is filled to your satisfaction!

finished shape viewed from the front, worked in long & short stitches


And here we are, these a few ways you can safely start and end your embroidery stitches with no worries ๐Ÿ˜Š This turned out to be a longer post than I thought for what seems like a small thing, but these are the steps that will hold everything securely together, so it is important. And I just had to give my two cents on the whole knot-or-no-knot business ๐Ÿ˜‰ I do hope this post was helpful to you, and if you know other methods of starting and ending embroidery that work well for you, please share them in the comments!


Happy embroidering my friends, and until next time!

Fondly,

Redwork Embroidery: upcycling with this great 19th century technique

March 25, 2021      Anne      Leave a Comment

Ever since I started embroidery a few years ago, simple vintage designs featuring pretty flowers and helpful little animals have been one of my favourite go-tos. There is something so pleasing about their simplicity, and theyโ€™re so easy and quick to stitch. Perfect for beginners, and perfect for adding handstitched touches here and there without it taking too long. And that’s exactly what redwork embroidery is all about!

redwork embroidery vintage birds and hoop stitched in red thread

Iโ€™m the absolute worst when it comes to deciding what to embroider because there are just SO many options! Iโ€™m working on improving my own doodling and drawing skills to be able to stitch more of my own designs, but I do love working with vintage and historical designs – and what better place to browse for them than Pinterest? Which can easily end up taking hours since we all know Pinterest is a most wonderful vortex of endless ideas! And if choosing or coming up with a design wasnโ€™t time-consuming already, choosing floss colours can take just as long!

An easy solution to that demanding conundrum is to opt for a single-colour technique like Redwork.

vintage teacup pincushion with close-up view of an assortment of red embroidery threads


What is Redwork?

As you might have guessed, rework is embroidery worked entirely in red thread, typically on white fabric (like linen or cotton). It emerged in the late 19th century,  when red was one of the only colourfast dyed threads available on the market. Easily accessible to people of all classes, it was often worked on schoolgirlsโ€™ samplers and embroidered on various home items such as pillows and tablecloths. Its popularity endured well into the 20th century and is still practiced today, especially on quilts and other patchwork. Redwork designs are typically very simple and full of old country charm. It features things like Sunbonnet Sues, flowers, fruits and vegetables, birds, and other cute little animals. Of course, there are no limits to what you can choose to embroider in redwork! Any design of your choice worked entirely in red thread can constitute redwork.

redwork embroidery vintage bird holding a piece of thread in its beak


Advantages of Redwork

Redwork is probably one of the most beginner-friendly types of embroidery out there. If youโ€™re looking to start stitching, a redwork project would be an excellent place to start. Not only donโ€™t you have to worry about colours, but redwork designs are usually all worked in basic outline stitches, using very few variations and little to no filling. Typical stitches used in redwork include the backstitch, split stitch, stem stitch, French knot, lazy-daisy, and sometimes a bit of satin stitch. You can easily decide to combine as few or as many as you want.

ย 

vintage bird design in redwork embroidery using splitstitch outlining technique (in progress)
Little bird outlined in splitstitch and “Wednesday” part of the title worked in backstitch.

Even for the seasoned embroiderer, the charm and simplicity of redwork lends itself beautifully to handmade accents for the kitchen or the sewing room. Plus, if you donโ€™t worry about filling in any shape, itโ€™s so quick to stitch!

lazy-daisy stitches to create flowers and leaves on embroidery hoop part of the design
I used the lazy-daisy stitch to create the flowers and leaves on the embroidery hoop design. The bird is done in splitstich and straight stitch (for the line details), and the needle and thread and done in backstitch.


Box Project

I had been wanting to try redwork for a while now, ever since falling in love with those cute, whimsical vintage patterns found all over the Internet. This box project was the perfect opportunity. In an effort to further organize my embroidery supplies, I decided to convert an empty Lindt chocolate box into a nice cozy home for them. As always, I spent an inordinate amount of time trying to decide what to embroider on the lidโ€ฆin the end, I finally decided to try redwork thanks to my fabric choice.

finished project filled with various sewing supplies like lace, thread, embroidery hoop, floss


I have this bag of miscellaneous quilting cotton squares (used for anything except quilting, apparently) and I had just the right amount of the red gingham ones to go around the box to cover it. And what would look better paired with red gingham than redwork!


materials used to upcycle an old chocolate box: fabric, ruler, pencil, scissors, embroidered fabric to cover the lid
red gingham quilting squares and bird snips
box lid cover in progress - gingham squares sewn to main embroidered fabric


I chose a vintage โ€œsew on Wednesdayโ€ design found via Pinterest, modified a little by adding my own quote. You can see the original here.

I worked most of it in backstitch and splitstich. I also used lazy-daisy for the flowers and some straight stitches here and there. It was super quick and easy! Using only one colour made it so much easier to re-thread the needle and carry the project with me for on-the-go stitching! I used two strands of DMC no. 816 for the entire design.


full view of redwork embroidery birds and embroidery hoop

ย 

I love filling blank spaces, so naturally I had to add a few other decorative touches, and found some little scraps of lace and the cutest buttons in the perfect shade of red.

ย 

close-up of red button and white lace used to decorate box lid corners

I sewed my little 3×3โ€™โ€™ gingham squares together to go around the lid, and then I stitched them to the redworked fabric for the lid top. More squares were sewn together to go around the bottom of the box, and hot glued them to the inside to hold in place.

red gingham squares going around the box
gingham fabric being hot glued around box


Turns out hot glue + fabric create bulk! No! Who would have thought?! Lo and behold, said bulk made the lid too small for the bottom and my box could no longer closeโ€ฆOOPS. Clearly I did not think this through. Guess thatโ€™s why they always told us not to mix fabric and glue in Costume Studies, lol!!

At least, I had started with the lid and the bottom was yet untouched. I was able to cut open one side and cut off a bit of the box bottom to make it smaller to fit under the lid. I canโ€™t cut a straight line to save my life so it turned out crooked, but you canโ€™t tell once the box is closed. And it closes so thatโ€™s all that matters!! ๐Ÿ˜‰


finished box covered with fabric and redwork embroidery
Finished dimensions ended up being 6 1/2″ x 8 3/4″


Overall Iโ€™m very happy with it despite its imperfections. It makes a charming addition to my attempts at organizing, and my little birds remind me to stitch everyday ๐Ÿ˜Š. It really is an easy project to do, the possibilities are endless and itโ€™s a great way to recycle a perfectly good, sturdy box. Pick any fabric you like to cover it, and embroider or decorate it however you want! (wow, I really donโ€™t make it easy to narrow down choices, do I??)


If youโ€™re also interested in these fun vintage patterns, check out the fabulous collection over at French Knots, and follow my Pinterest board.

Let me know your thoughts on redwork in the comments! I hope you try it and are as charmed by it as I was.


Fondly,


Sources:

The book Simply Redwork by Mandy Shaw (published by David & Charles in the UK, 2014) and the article โ€œBlack and Blue and Red All Overโ€ from the Embroidery Library website (last accessed March 25th, 2021) were consulted to learn more about the history of Redwork.

The Only Embroidery Tools You Need

March 24, 2021      Anne      Leave a Comment

embroidery tools you will need to get started

ย 

Starting a new hobby can often become rapidly very expensive. The good news with getting into embroidery is that you donโ€™t need a whole lot of fancy tools and equipment. Getting started is easy and inexpensive! In fact, you probably already have a few of the following items lying around the house.

ย 

Embroidery Hoop:

wooden embroidery hoops of varying sizes, featuring a larger hoop on a stand

ย 

Embroidery hoops are essential for keeping your fabric taut and the tension even. They come in a variety of sizes and materials, generally ranging from wide 12โ€ ones to small 4โ€ ones. The most common ones are made of wood or plastic. Usually, they have an adjustable screw on the outer ring to make it easy to tighten the fabric and keep the tension even. They can be found in major craft stores (in Canada, you can get them at Michaels or Fabricville/Fabricland). You can also purchase them online. You can even get fancy ones with a stand, which are especially great because they free both your hands. These are a bit harder and more expensive to find however, and are not essential if you’re just starting out. Any hoop size can work, it will really depend on the size of your project. I like to keep a few of different sizes on hand!

ย 

tightly secured fabric in embroidery hoop showing screw mechanism

ย 

Side Effect Warning:

Embroidery hoops make the cutest frames and will soon become your preferred way of displaying your embroidery… prepare to have all your walls decorated with them. ๐Ÿ˜‰

ย 

Fabric:

different fabrics suitable for embroidery; linen, cotton blend, factory cotton, medium weight cotton and light-weight cotton

ย 

Pretty much any fabric can be embroidered on, but some are definitely easier to work with! Woven fabrics are especially ideal. Think light to medium-weight cottons or cotton blends, or linen for example. I would recommend something with a tight enough weave so that your stitches remain secure, unless you are planning on using the weave of the fabric to guide your stitches (such as for cross-stitch). I recommend staying away from anything knit or stretchy, as itโ€™s so much more difficult to keep the tension even and prevent puckering. Youโ€™ll also want to avoid using fabric that is too see-through (like liningโ€ฆI tried that once, donโ€™t recommend!). That’s because all the back threads and knots and other such bits of floss will show through on the good side. However, if your fabric is too heavy-weight and thick, it will be more difficult to transfer your design if youโ€™re tracing it from a pattern or an image.

ย 

Side Effect Warning:

Iโ€™m not kidding when I say that pretty much every type of fabric can be embroidered on though – youโ€™ll soon find yourself adding embroidery on everything, even things that arenโ€™t fabricโ€ฆ(I recently cross-stitched a plastic phone case lol! Super fun but hard on the fingers.)

ย 

Needles:

Perhaps the most necessary embroidery tool, the needle is an embroiderer’s best friend. You obviously can’t stitch without it! There are a few different kinds of embroidery needles out there, varying in length, size, and sharpness. Embroidery needles (also called crewelwork needles or sharps) are longer and have a bigger eye than common sewing needles. Because embroidery floss is thicker than sewing thread, you will want a needle with an eye wide enough to thread your floss, and a tip sharp enough to pierce the fabric repeatedly. Embroidery needles usually come in packs that identifies them by number; the higher the number, the smaller the needle. The sizes range from 1-12, and one pack will usually feature more than one size (I personally like the 3-9). The varying lengths and sizes will depend on the kind of stitches youโ€™re interested in trying. I would recommend trying a few different ones and seeing what feels most comfortable.

ย 

two different crewelwork needles, size 3 and size 9

ย 

Ideally, you donโ€™t want to use too big a needle to create unnecessarily large holes in your fabric, or too small a needle that you canโ€™t thread it properly. If you start with getting a set of โ€œembroideryโ€ or โ€œcrewelworkโ€ needles within the 1-12 size range and you work with DMC cotton floss (or Anchor or another equivalent), youโ€™ll be good to go! You can find embroidery needles in major or local craft stores, or online directly on the DMC website.

ย 

Side-effect warning:

Making cozy little homes for your needles in the form of cases and needlebooks will become as much a priority as a necessity.

ย 

Floss:

DMC and Anchor embroidery floss in shades of pink and green, as well as a pair of stork snips

Aaaahh, this is undoubtedly the best part and the most fun to buy! The two major brands of cotton floss are DMC and Anchor, although Iโ€™ve mostly only seen DMC sold in stores around here. Again, you can get embroidery floss at most major craft stores as well as in various other local craft stores or online (the DMC website is pretty great!). Anchor and DMC use a different numbering system to identify all their colours, but there are several useful charts you can find online for colour equivalencies.ย 

ย 

Cotton embroidery floss comes in stranded skeins of about 8 meters long (8.7 yards). The 6 strands are loosely woven together, allowing you to easily separate them depending on how thick or thin you want your embroidery to be. Most surface embroidery projects are often stitched using 2 or 3 strands at a time. However, you can use as few or as many as you want depending on what youโ€™re stitching and what you want the overall effect to be.

ย 

DMC green embroidery floss showing the 6 twisted strands that form the skein

ย 

Side effect warning:

Buying floss is one of the most addictive things ever, as youโ€™ll soon convince yourself that you need ALL. THE. COLOURS.

A box full of miscellaneous DMC and Anchor embroidery thread, winded on cardboard cards

ย 

Snips:

Snips or embroidery scissors (basically small, precise sewing scissors) are an essential tool for embroidery because youโ€™ll need a small, fine blade for making precise and clean cuts. The fine point of embroidery scissors makes it easy and un-stressful to snip threads close to the main fabric and embroidery work. Snips also come in different shapes and sizes. Ideally youโ€™ll want a pair with a blade about 1-2โ€ long. They can be picked up at most major craft stores or you can browse Etsy to find some truly unique or vintage ones!

ย 

two pairs of stork scissors for detailwork, 1 small and 1 bigger

ย 

Iโ€™ve somehow ended up with two pairs of these popular stork-shaped ones, of different sizes. Theyโ€™re definitely my favourite kind of snips so far. The blade is nice and thin, its fine point ideal for detailwork and making clean cuts. I love them and strongly recommend them! I got the smaller pair on Amazon, and the larger one at my local Fabricville store. They are typically around ten dollars.

ย 

Side-effect warning:

Even if you donโ€™t end up getting bird-shaped ones, snips have a tendency of flying away. I strongly recommend tying a piece of string or ribbon to keep them around your neck, or youโ€™ll find yourself losing them all the time (and I should consider taking my own advice).

ย 

Pencil:

There are many different ways of transferring an embroidery pattern onto fabric, and many different tools to do so. If youโ€™re just starting, an HB or mechanical pencil will do just fine. It doesnโ€™t work for every type and colour of fabric, but if youโ€™re using a lightweight cotton or linen that is see-through enough, it works wonderfully. Because a well-sharpened (or mechanical) pencil tip is so precise, it is ideal for marking or transferring patterns with small details.

ย 

various writing tools for transferring embroidery patterns; 0.7mm mechanical pencil, water-soluble pen, iron-on transfer pen, chalk mechanical pencil

Other useful marking tools include the water-soluble pen, which washes off easily with water (2).ย  The iron-on transfer pen (3) transfers your design using heat. The chalk pen (4) works like a mechanical pencil but uses chalk refills instead of graphite. The latter can prove very useful if youโ€™re planning on embroidering on darker fabrics, but they can be expensive.ย 

ย 

Side Effect Warning:

Even though I love trying out different kinds of transfer method, I have to be honest and admit that the mechanical pencil really is my favourite! No trick for this one. Although you may end up like me and just convince yourself you need the latest transfer pen they come up with. Maybe ๐Ÿ˜‰

ย 

Window:

embroidery pattern and fabric taped to a window, letting natural light filter to be able to transfer the pattern

ย 

This is probably not the first thing that comes to mind when you think “embroidery tools”, but! If youโ€™re using a paper pattern โ€“ or just an image you want toย  copyโ€“ the easiest and cheapest way to get it onto your fabric is by tracing it over a window during the daytime. Simply tape your paper pattern to the window and then secure your fabric over it. Trace your design onto the fabric using the marking tool of your choice. The iron-on transfer pen won’t work for this method, but a pencil will work great. Voilร , natural lightbox!

ย 

Side Effect Warning:

Speaking of lightboxes, if youโ€™re serious about getting into embroidery, youโ€™ll probably want to invest in an actual one. While the window trick does work quite well, it can become very tiring on the arms and sadly doesnโ€™t work after like, 4 pm during the winter when darkness comes on so quickly.

ย 

And thatโ€™s it!! Those are the only embroidery tools you really need to get started and achieve satisfying results, and you donโ€™t need to break the bank to do so. Embroidery is a wonderfully affordable hobby. I hope you found this post useful and that you decide to give embroidery a try if you were thinking about it. Happy stitching!

ย 

Fondly,

embroidery tools for beginners
Pin to save for later!

  • « Go to Previous Page
  • Page 1
  • Interim pages omitted …
  • Page 4
  • Page 5
  • Page 6
  • Page 7
  • Go to Next Page »

Primary Sidebar

Recent Posts

  • Floral Garden Bunting Project: a Wrap-Up on the 2023 Stitch-Along
  • Fall Floral Embroidery Pattern: Calendula Wreath
  • “Embroideries From an English Garden” by Carol Andrews โ€“ Book Review
  • Botanical Wreath Project: A Pattern for Each Month
  • 2023 Free Yearly Stitch-Along + Mini Needle-Painting Tutorial

Welcome

photo of Anne-Marie from The Diary of a Northern Belle

Hello I'm Anne! Welcome to my little corner of the Internet where I share my passion for hand embroidery with you through tutorials and patterns. I hope that you enjoy browsing and leave with some new inspiration!

Archives

  • January 2024
  • November 2023
  • August 2023
  • February 2023
  • January 2023
  • November 2022
  • October 2022
  • August 2022
  • July 2022
  • June 2022
  • May 2022
  • April 2022
  • March 2022
  • February 2022
  • January 2022
  • December 2021
  • November 2021
  • October 2021
  • September 2021
  • August 2021
  • July 2021
  • June 2021
  • May 2021
  • April 2021
  • March 2021

Blog Archive

Categories

~ Diary of a Northern Belle

Northern Belle Atelier is taking a break ๐ŸŒธ๐Ÿ’– Northern Belle Atelier is taking a break ๐ŸŒธ๐Ÿ’–

Today (Feb. 09th) is the last day to place your order for any physical items in my shop (kits, needle minders, or finished works). I will be removing the listings over the weekend. PDF patterns will remain available for now, but they may be taken down at any time (so if you've had your eye on one, I suggest grabbing it before they're gone! ๐Ÿฅฐ).

I will also be tuning off Instagram in the coming days, but you can still reach me via my business emails if you need. My blog will remain up for the time being. ๐Ÿ’•

Thank you ever so much for all the support you've shown my little business since I began sharing my embroidery here! It has meant so much to me to be able to do this, even if just in a small way. ๐Ÿ’–๐Ÿชก Wishing you all some beautiful stitches ahead!

Anne
Xoxo
February Wreath aka "Victorian Valentine" pattern February Wreath aka "Victorian Valentine" pattern from last year ๐Ÿ’–๐ŸŒธ๐ŸŽ€ I love this one so much and it's perfect for Valentine's Day coming up!

Find it in my Etsy shop ๐Ÿ’œ

(Sorry for the shaky video!!)
Needle minders will be leaving my shop soon!! ๐Ÿ’ Needle minders will be leaving my shop soon!! ๐Ÿ’ Snag a cute little fruity needle minder for your next embroidery project before February 9th! All remaining needle minders in my shop are 10% off until then ๐Ÿ’•๐Ÿ“๐Ÿ’๐Ÿ’›
โœจ๏ธ IMPORTANT UPDATE โœจ๏ธ I will be disconti โœจ๏ธ IMPORTANT UPDATE โœจ๏ธ

I will be discontinuing embroidery kits from my shop very soon, but I still have 2 left of this pretty summer wreath up for grabs!! ๐ŸŒผ๐Ÿ“

I love this design and the kit comes with everything you need to make the project: two pieces of cotton fabric, thread card loaded with DMC floss, two needles, a good quality 6" hoop, and the PDF pattern! All presented in a handy folder to make it easy to keep everything together ๐Ÿค๐Ÿ’›โค๏ธ

Visit my Etsy shop (linked in bio) if you're interested!! They won't be around for long!
Thank you so much for all the love on the Floral G Thank you so much for all the love on the Floral Garden bunting!! ๐Ÿ’–๐ŸŒท๐ŸŒป Following several inquiries from some of you who were missing some or all of the patterns from this project, I've decided to link them in a handy-dandy blog post for easier access! ๐Ÿ’• I've linked it via my bio if you want to have a look and get the patterns! I like to give my subscribers a bit of exclusivity, but since this project has now come to a close, I've decided to make it available to everyone. ๐Ÿฅฐ

I may also have taken that opportunity to write a bit about each flower, the inspiration behind the designs, and of course their meanings according to the Language of Flowers ๐Ÿ˜Š๐ŸŒฟ๐ŸŒป If that sounds of interest to you, read  the post to find out more! I've also linked some stitch tutorials that may be helpful. 

Happy stitching! ๐ŸŽ€๐Ÿชก๐ŸŒผ

Anne
The Floral Garden stitch-along has come to a close The Floral Garden stitch-along has come to a close and the bunting has been sewn and hung! ๐ŸŒป๐ŸŒท๐ŸŒฟ what a joy it was to work on throughout the year, and I hope you've enjoyed it too! I'm thrilled with the final result ๐Ÿ˜

Thank you so much for all the lovely comments and enthusiasm for this project. I've just sent the final instructions + bunting template to my email subscribers ๐Ÿ’Œ it isn't too late if you'd like to give this project a try - you can sign-up via the link in my bio and receive the links to all 12 floral motifs from last year + the instructions for the bunting!! ๐Ÿ’•

The embroideries are beginner-friendly and perfect if you want to try a bit of needle-painting, and the bunting part is quite easy and quick to put together (compared to last year's mini-quilt haha!) ๐ŸŒท๐Ÿ’•๐ŸŒฟ

Happy stitching!!
Winter Fox ๐ŸฆŠ๐Ÿค๐ŸŒฒ I think this makes the fir Winter Fox ๐ŸฆŠ๐Ÿค๐ŸŒฒ I think this makes the first completed embroidery for 2024! Absolutely loved working on this and love the mix of watercolor with embroidery! Can't get enough of the little pinecones ๐ŸคŽ
Load More... Follow on Instagram

Copyright The Diary of a Northern Belle © 2025 ยท Wordpress Theme by Hello Yay!

We use cookies on our website to give you the most relevant experience by remembering your preferences and repeat visits. By clicking โ€œAcceptโ€, you consent to the use of ALL the cookies.
Cookie settingsACCEPT REJECT
Manage consent

Privacy Overview

This website uses cookies to improve your experience while you navigate through the website. Out of these, the cookies that are categorized as necessary are stored on your browser as they are essential for the working of basic functionalities of the website. We also use third-party cookies that help us analyze and understand how you use this website. These cookies will be stored in your browser only with your consent. You also have the option to opt-out of these cookies. But opting out of some of these cookies may affect your browsing experience.
Necessary
Always Enabled
Necessary cookies are absolutely essential for the website to function properly. These cookies ensure basic functionalities and security features of the website, anonymously.
CookieDurationDescription
__cfduid1 monthThe cookie is used by cdn services like CloudFare to identify individual clients behind a shared IP address and apply security settings on a per-client basis. It does not correspond to any user ID in the web application and does not store any personally identifiable information.
cookielawinfo-checbox-analytics11 monthsThis cookie is set by GDPR Cookie Consent plugin. The cookie is used to store the user consent for the cookies in the category "Analytics".
cookielawinfo-checbox-functional11 monthsThe cookie is set by GDPR cookie consent to record the user consent for the cookies in the category "Functional".
cookielawinfo-checbox-others11 monthsThis cookie is set by GDPR Cookie Consent plugin. The cookie is used to store the user consent for the cookies in the category "Other.
cookielawinfo-checkbox-necessary11 monthsThis cookie is set by GDPR Cookie Consent plugin. The cookies is used to store the user consent for the cookies in the category "Necessary".
cookielawinfo-checkbox-performance11 monthsThis cookie is set by GDPR Cookie Consent plugin. The cookie is used to store the user consent for the cookies in the category "Performance".
viewed_cookie_policy11 monthsThe cookie is set by the GDPR Cookie Consent plugin and is used to store whether or not user has consented to the use of cookies. It does not store any personal data.
Functional
Functional cookies help to perform certain functionalities like sharing the content of the website on social media platforms, collect feedbacks, and other third-party features.
Performance
Performance cookies are used to understand and analyze the key performance indexes of the website which helps in delivering a better user experience for the visitors.
Analytics
Analytical cookies are used to understand how visitors interact with the website. These cookies help provide information on metrics the number of visitors, bounce rate, traffic source, etc.
Advertisement
Advertisement cookies are used to provide visitors with relevant ads and marketing campaigns. These cookies track visitors across websites and collect information to provide customized ads.
Others
Other uncategorized cookies are those that are being analyzed and have not been classified into a category as yet.
SAVE & ACCEPT
Powered by CookieYes Logo