• Skip to primary navigation
  • Skip to main content
  • Skip to primary sidebar
  • Home
  • About
  • Contact
  • Privacy Policy
  • Disclosure
  • Terms of Service
  • Nav Social Menu

    • Email
    • Facebook
    • Instagram
    • Pinterest

The Diary of a Northern Belle

Hand Embroidery

  • Stitch Library
  • Learn Embroidery
    • All posts
    • For Beginners
    • Stitch tutorials
    • Tutorials & How-To’s
    • Join a stitch along
    • Book Reviews
  • English Paper Piecing
  • Kits & Patterns
    • PDF Patterns
    • DIY Kits
    • Botanical Wreaths
  • Stitch Along
  • Blog
  • Freebies
  • Shop

THE LATEST

Floral Garden Bunting Project: a Wrap-Up on the 2023 Stitch-Along

Fall Floral Embroidery Pattern: Calendula Wreath

“Embroideries From an English Garden” by Carol Andrews – Book Review

Blog

Garden Bouquet Embroidery Part 3: Beautiful Berries

August 28, 2021      Anne      Leave a Comment

Who’s ready for the next part of the Garden Bouquet project? I know I am!


garden bouquet part 3 beautiful berries


If you haven’t seen Part 1 or 2 of the Garden Bouquet project, here they are:

Garden Bouquet part 2: wild roses
garden bouquet project part 1

Today, we will be looking at the berries. There are two branches of berries in this design: raspberries and currants.

I embroidered my raspberries pretty much the same way as I did in this project, so I will go over it quickly. If you want more details, you can have a look at Ripening Raspberries, a project where I combined embroidery and pressed leaves.


Embroidering the Raspberries


thread key for raspberries: branch & leaves = DMC 3346, 3347, Berries = DMC 304, 347, 3331


I didn’t use beads this time, only French knots. I wasn’t planning on using beads anywhere else, so I thought it might look odd to have just one element with beads. So instead I filled the whole berries with French knots without leaving any gaps. I used three strands of DMC #304, #347, and #3831, and tried to distribute the colours evenly-ish. The sepals are made with lazy-daisy stitches, using two strands of DMC #3347.


embroidered raspberries with french knots


The branch is embroidered with a stem stitch with two strands of DMC #3346. The leaves are done in straight stitches, angled and placed to create a bit of a jagged edge. I used two strands of DMC #3347 and #3346. These were done rather quickly and without any clear method. I knew that I wanted to differentiate them from the rose leaves, so I used different shades of green, and tried to make the leaves smaller and thinner.


embroidered raspberry leaves with straight stitches


I absolutely love how it turned out! This was one of the easiest part of this garden bouquet and such a breeze after slaving over the wild roses 😉


embroidered wild roses and raspberries on garden bouquet project


Embroidering the Currants


thread key for currants: Branch & leaves = DMC 734, 937, 3345, 433, Berries = DMC 304, 321


Ah, the currants. I had a wonderful plan to cover beads with floss to create a beautiful stumpwork (3D) effect, but sadly all the beads I had were too big or too small. There was no time for an emergency trip to the crafts store, so I had to abort the plan and think of something else.

Not to be deterred in my stumpwork ambitions, I decided to try something else. I really didn’t want to make the berries flat, and French knots wouldn’t really have worked in this case. I remembered seeing “raised” satin stitch around before, and using stuffing or other materials to create a 3D effect. So I went with a cotton ball…the currant berries are so small that I only needed teeny tiny little pieces at a time.

First, I outlined each berry with a small backstitch, to have a good guideline for filling it.


currant berry outlined with backstitch


Then, I took what felt like a microscopic piece of cotton ball (I’m using just a regular old cotton ball from the drugstore) and shaped it as best as I could to form it into a little ball. I then place the tiny ball in the outlined shape.


cotton ball to create stumpwork effect


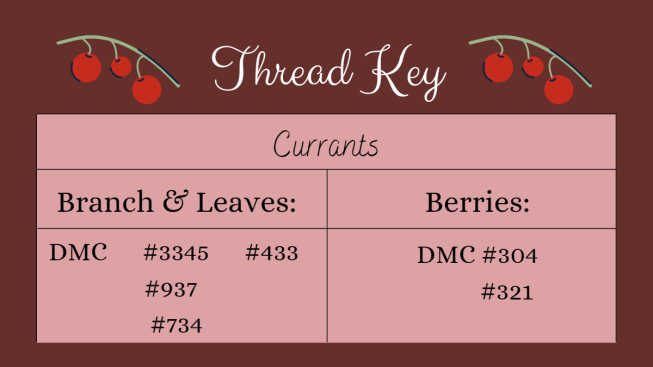
With one strand of DMC #304 or #321 (I alternated between two shades of red), I anchor the cotton ball by taking a few stitches over it.


currant embroidery - covering the cotton ball with satin stitch


With a satin stitch, I cover the entire ball, until none of the white shows through. And it makes a beautifully raised little red berry!


covered cotton ball with satin stitch to form a currant berry


So cute!

Once they were all done, I added a little “end” to really make them look like currants. This was done with one strand of DMC #433, and it’s just a very small straight stitch. I placed them in the direction where it made the most sense for each currant hanging from the branch.


embroidered currant berries with little "end" in brown floss


The branch was added afterwards, using two strands of DMC #433 and a split stitch.


And lastly, the leaves!

I had no idea what currant leaves looked like, so Pinterest was very useful here for some reference images. I remember stitching these very late at night, determined not to leave them for the next day, so they’re a bit less refined than the rose leaves. It’s hard to tell though, since they’re well hidden 😉

Again, same approach as before. Outline in split stitch first. Then I used two strands of DMC #937 and #3345, and very messy long & short stitches to cover the leaves. There really was no plan for this, just improvisation and deciding where to add a bit of shading on the spot. Currant leaves also have a ragged edge, so I tried to replicate that a bit all around my leaves by ending the stitches in different spots.


embroidered currant leaf in needle painting


I left some space along the center of the leaves for the stem and veins. Those were stitched with one strand of DMC #734 in straight stitches, again in a very impromptu manner.


finished embroidered currant berry branch on garden bouquet project


I really love how it turned out though (I say this a lot, I’m sorry! But it’s true!). The raised satin stitch with cotton ball stuffing worked wonderfully and I definitely want to try it again!! The currants look very solid and juicy.


embroidered currant branch next to embroidered wild rose in garden bouquet project


And that’s the berries over and done with!

The garden bouquet is starting to slowly resemble something at last. Woo! I hope you enjoyed this part, and I would love to know your thoughts in the comments. What do you think of the stumpwork idea? Have you ever tried something similar? How do you like to stitch your berries?

Stay tuned for Part 4 of this project, where we will tackle the lily. The majestic centerpiece of this piece, a flower amongst flower. I have an idea on how I want to make it, but will it work? It doesn’t involve a lot of thread… Can’t wait to see and share it with you all!

Thank you for following along on this journey, and be sure to connect with me on Instagram too for more progress pics & stitching reels!


Fondly,

embroidered berries garden bouquet part 3

Garden Bouquet Embroidery Part 2: Wild Roses

August 26, 2021      Anne      Leave a Comment

Hello dear friend, and welcome to the second instalment of the Garden Bouquet project: the wild roses! (Click here for Part 1 if you missed it)


wild roses garden bouquet part 2


I’ve worked long and hard on this part, so I’m really excited to share it with you. We will be looking at the wild roses today! Roses are probably my favourite flower (although I kinda love any flower), and it was a real delight to bring these to life.

My plan from the beginning was to embroider the wild roses in needle-painting style using the long & short stitch. I knew they would probably take the longest to stitch out of all the elements in the bouquet, so I decided to do them first. They did indeed take forever. That’s the downside of needle-painting with one strand, but the results are worth it!


Here’s a little breakdown of all the threads I used for my wild roses:

thread key: branch DMC 898, Leaves DMC 3345, 3363, Brillanté d'Alger 594, Petals DMC 3805, 603, 605, 776, 778, 963, 225, Flower centers DMC 743, 744, 728, 729


Let’s Begin


First, I stitched the branches. That was the easiest part, I actually used two strands and took pretty big stitches. The blending is pretty careless, and it looks a little chunky in certain spots. This was (semi) intentional to give the branches a more natural look. I could have used more than one shade of brown to add more dimension, but decided to keep it simple and only used DMC #898.

embroidered branches long & short stitch


Next, I tackled the leaves, since they are more in the background than the flowers themselves. I also stitched them using long & short stitches, in a few different shades of green. Each leaf is fairly small so I knew the shading would be a bit tricky, but I think it turned out really well.

I started by outlining each petal with a split stitch, using one strand of green floss. Since the outline ends up being entirely covered, it doesn’t really matter which shade you pick. Ideally not the darkest (sometimes it can be seen through the stitches), unless the stitches covering the outline will be dark as well.

split stitch outline on leaf


Once the shape is outlined, I begin making long & short stitches in one shade of green to cover a certain area. Here I sometimes used two strands to go a little faster, but results are definitely nicer with only one strand. I planned in advance where I wanted the shade to hit my leaves, and which part of the leaves would require darker thread. Wild rose leaves have darker veins, so I knew the middle of my leaves would be darker.

long & short stitch first layer on leaf
second layer of shading on leaf
long & short stitch shading on rose leaf
finished leaf in long & short shading stitches


I also tried to create a jagged edge to each leaf to make them appear natural. Wild rose leaves have tiny little dark red thorns all around them, but I decided to just leave it at green since my leaves were very small. I created the jagged edge by ending stitches a little further than the splitstitched outline (usually stitches are evenly placed just outside that edge) and spacing them out.

finished leaf embroidered in long & short stitch

I used DMC #3363 and Brillanté d’Alger #594 to cover the leaves in long & short stitches, and then added a few more stitches in DMC #3345 to create the veins and add a bit more shadow as desired.


Here’s a look at the finished leaves:


finished cluster of wild rose leaves embroidered in long & short stitches
(little cluster of leaves situated behind a rose)
finished wild rose leaves in long & short stitch
(finished leaves against the rose branches on either side of the design)


The Roses


Once the branches and leaves were complete, it was finally time to stitch the rose flowers. They were hands-down the most time-consuming part of this entire project by a long shot, but I loved making them. Working with so many pinks was absolutely fantastic! Definitely a colour palette I really like.

I used the same approach as I did with the leaves. Splitstitch outline each petal first, then gradually fill with long & short stitches to create the needle-painting effect.

petal outline in split stitch


I played around with my different shades of pink a lot before deciding which ones I’d use, and how I’d use them. I had recourse to Trish Burr’s fabulous book Colour Confidence in Embroidery to help me out a bit. In particular, I observed and analyzed the shading in the French Rose project. It’s a red rose, but it gave me a good idea of where to place my lighter and darker shades.

I still experimented as I went along, and if you look closely at each finished flower you can easily see that they’re all different, and that most petals within the same flower are also different. The effect isn’t always very realistic, but for the purposes of the project, it works. 😊 I’ll be honest, I’m really no expert in long & short stitch. I’m still playing around with it, practicing, and learning how to do it better. But I must say I’m really pleased with how most of my petals turned out!


Here’s a look at how I fill a petal:


1. I decide which shades I want to use and in which order. I used seven different pinks to make my roses, but I didn’t use all shades in each petal. The gradients varied, as did the placement of lighter and darker shades.

2. In this case, I’m going dark to light. So I stitch the first layer in DMC #603. I like to make guidelines with my thread to keep the angle right, especially with a petal shape. The stitches are long and short, varying in length, creating a very uneven edge.


first layer of long & short stitch on wild rose petal
first layer of the long & short stitch on rose petal


3. Once the first layer is completed, I pick a slightly lighter colour (DMC #605) and begin to fill the second layer. I prefer to stitch from bottom to top, so I begin my stitch towards the base of the petal, and end it somewhere in the first layer. To create a beautiful blending effect, the idea is to end the stitches of a new layer well within the previous ones. In other words, I don’t end my stitches at the edge of the first layer, but higher, nestled among the stitches of the previous layer. Again, the length of these stitches shouldn’t be uniform. It looks more naturally blended if the stitches are of varying lengths.

I repeat these steps with as many colours as I wish. For this petal, I added a third and fourth layer, using DMC #776 and #963.


finished petal in long & short stitch shading

Doing this with only one strand of floss at a time is incredibly time-consuming, but it’s oh so lovely!


Here’s a look at a different wild rose, where I did the shading in the petals differently.


shaded wild rose petals in long & short stitch
The petal to the left was the very one I made, and I found it too pale. I tried something completely different for the one above it, where I placed the darkest shade closest to the center.


Wild Roses in progress…

embroidered wild roses in needle painting style


Rose Centers


Once all my petals were stitched, it was time to pick some joyful yellows for the centers. I went with DMC #728, #729, #743, and #744 (#729 is a little darker, a very light goldenish brown). I made straight stitches from the center to the petals using #743 and #744, leaving a very small circle in the middle (the center of the center, lol). In this little center, I used two strands of #743 to make three French knots, filling up the space. Still using only one strand of floss, I used DMC #728, #729, and #744 to make French knots scattered all around the outer edge of the center (at the base of the petals). As much as possible, I made them close to the end of the straight stitches.

yellow straight stitches to form wild rose center
french knots in the very center of the embroidered wild rose


Using only one strand of floss, I used DMC #728, #729, and #744 to make more French knots, scattered all around the outer edge of the center (at the base of the petals). As much as possible, I made them close to the end of the straight stitches.

finished embroidered wild rose
(this is the finished center of a different rose flower, because apparently I’m not very consistent with my photos, lol)


It really makes the rose come alive, doesn’t it?? I’m so happy with how that turned out, they almost look real!

The last little touch was adding little thorns along the branches. I used one strand of DMC #898 (same colour as the branch).

finished embroidered wild roses


And here we are! WILD ROSES COMPLETED!! WEEEE!!! (Sorry but this totally deserved some all caps squealing for joy :P)


completed branch of embroidered wild roses


I read in a book once that a rose by any other name would smell as sweet, but I’ve never been able to believe it. I don’t believe a rose would be as nice if it was called a thistle or a skunk cabbage.”

L.M. Montgomery, Anne of Green Gables


finished wild rose close-up


I hope you enjoyed following along and I can’t wait to show you Part 3! Raspberries and currants are up next! 😊


Other posts you might find useful:

  • How to Start & End Embroidery Stitches
  • The Only Embroidery Tools You Need
  • French Knot Made Easy: Tutorial


And just in case you missed, here’s PART 1 of the Garden Bouquet project, all about the inspiration behind the pattern & setting up for stitching.

garden bouquet project part 1


Fondly,

garden bouquet embroidery: wild roses
Save to pin for later!

5 Inspiring Authors to Read Today

August 7, 2021      Anne      2 Comments

Hello friend!

I thought I’d break up the Garden Bouquet project a bit (mainly because I don’t have much new progress to show hahaha!) and post about some inspiring authors this week! If you’ve been following the blog for a bit now, you probably know that I love books and get a lot of stitching inspiration from reading novels. If you’re new here, hello I’m Anne and I’m a bookaholic who loves embroidery. 😉 In any case, welcome to everyone! Today we’re having a lovely little tea party in which we will discuss 5 wonderful authors whose writing is inspiring. These authors craft beautiful worlds where you will want to lose yourself for hours, and emerge with new, fresh inspiration to live and create and find joy.

So pull up a chair, make yourself comfortable, and I will pour you a steaming cup of Earl Grey.


Literature inspiration - 5 authors you should read


**Click on any book title with a link to read the full review on Goodreads 🙂


1. Lucy Maud Montgomery

“There is so much in the world for us all if we only have the eyes to see it, and the heart to love it, and the hand to gather it to ourselves-so much in men and women, so much in art and literature, so much everywhere in which to delight, and for which to be thankful.”

Anne of the Island


stack of l.m. montgomery books with wild goldenrod

Of course, I simply must start this list of inspiring authors with the best of the best, the ultimate authority on all things inspiration – none other than L.M. Montgomery. Her books exude absolute beauty and loveliness. Have you ever read a book where each sentence was delightful? Each sentence somehow better than the next, so well-crafted yet never forced? That’s what Montgomery’s writing is like.

Descriptive, poetic, and yet utterly compelling in its simplicity, her writing flows naturally from page to page, transporting you to a time and place when life was simpler and people were happy. Famous for her beautiful descriptions of nature, Montgomery’s books are a complete delight to read and really make you want to learn to see and feel and appreciate nature for yourself (and perhaps attempt a line or two of poetry!). From giving imaginative names to places to describing nature in all its glory in a most loving way, the inspiration breathed into each of her books is endless.

paperback copies of Chronicles of Avonlea and Anne of the Island books surrounded by wildflowers and lace

Her stories are also filled with all the lovely little every day things that make us grateful to be alive. Baking pies, sewing a new dress, going for a walk over sun-drenched meadows, picking apples, the list goes on forever. Full of Edwardian charm and innocence, Montgomery’s books feature characters as endearing and loveable as her descriptions are, and I guarantee you’ll love it. There’s only one book of hers I haven’t liked as much as the others so far, but every single other one I’ve read was pure gold.

Aside from the most famous Anne of Green Gables series, other titles worthy of note include: The Blue Castle, The Doctor’s Sweetheart & Other Stories, and Chronicles of Avonlea.


2. Louisa May Alcott

“Have regular hours for work and play; make each day both useful and pleasant, and prove that you understand the worth of time by employing it well. Then youth will bring few regrets, and life will become a beautiful success.”

Little Women


hardcover copy of little women by alcott surrounded by queen anne's lace and pressed daisies

While we’re on the subject of all things simple and lovely, what could be more inspiring than Little Women? Not only does it have much to teach us in terms of life lessons, but who isn’t inspired to draw, or paint, or write, or sew, or launch their own theatre club with private mailbox after reading the book or watching the movie? Little Women makes me want to craft. To create. To Make Things. Also to find a sweet, loving husband, but that’s not the topic of this post 😉. It’s such an inspiring read for so many reasons, and makes me want to be productive and try new things just by following what the four heroines are up to.

open Little Women book with pressed daisies

Alcott definitely has a lovely writing style and I’ve enjoyed some of her short stories as well, but I find it’s really the subject matter and imparted bits of wisdom that make her writing inspiring. It makes you want to be better (and not just at crafts lol). Reading one of her stories really just makes you want to take action, and I love that.

The Quiet Little Woman is one of my favourites of her short stories so far. It was such a sweet story that brought tears of joy and sadness to my eyes.


3. Georgette Heyer

“It was growing late, and though one might stand on the brink of a deep chasm of disaster, one was still obliged to dress for dinner.”

April Lady


a few inspiring books by author georgette heyer

As much as I love L.M. Montgomery and Louisa May Alcott, the love I have for Georgette Heyer’s books is just not the same. Probably my favourite author ever, Heyer has been crowned Queen Supreme of the Regency romance novel for her hilariously sublime portrayal of Regency life. Historically accurate yet undeniably escapist, Heyer’s novels are the perfect blend of comedy of manner, romance, and adventure. Ranging from mad romps through London or Bath (as in Frederica or Bath Tangle), to the quiet countryside (Venetia), there’s something for everyone to delight in. Her witty dialogue is unparalleled, and I warn you, you will laugh out loud at certain passages. 😉


Historical Inspiration


When I first started reading Heyer’s books, I was really struck by the quantity of fascinating period detail she’d manage to weave through her stories. It never felt too much or too forced, it was just beautifully illustrated. You can see the glittering ballrooms, the fashionable dresses, the well-dressed gents as clearly as if you were looking at a painting. It’s amazing. And it never fails to provide ample historical sewing or needlework inspiration. One day, I will recreate Léonie’s presentation gown, or Frederica’s ball-gown for her sister’s come-out.

front cover of Georgette Heyer's Frederica surrounded by wildflowers

“With a Georgette Heyer you don’t buy a book, you buy a world. If its suits you, you settle down forever.”

Time Magazine

I haven’t read all her books yet (she wrote over 30 historical romances!), but I already have so many favourites!! All the ones previously mentioned are top favourites: Frederica, Bath Tangle, Venetia, and These Old Shades, in which Léonie appears. And there are so many more!!


4. Jen Turano

“’I can cry at the drop of a hat.’
‘You find hat-dropping distressful?’
‘If it’s a nice hat, and it has dropped in the mud, certainly. I could cry about that for days.'”

A Most Peculiar Circumstance


various books by inspiring author Jen Turano

Someone once described Jen Turano as the American Heyer, and she was so right! Jen Turano is a modern-day author who writes fabulously farcical comedies set during the American Gilded Age (often taking place in New York or other such places where socialites dwell). As with Heyer, you enter into a wonderfully glamorous world full of witty repartee and screwball comedy. Her books are much less accurate and plausible than Heyer’s though. The emphasis is really on fun and comedy. Little of what goes on in her novels actually reflects life in 1880 New York, but it’s endlessly diverting and the characters are absolutely charming.

book copy of A Match of Wits by Jen Turano

I’ll be honest, some of her books were a bit much for me sometimes, but I have such fond memories of the Ladies of Distinction series that I simply had to include her on this list! Even the books that I enjoyed less (usually because they were just a *tad* too silly, and I was probably in the mood for something more serious) still had that wonderfully escapist quality that I find so inspiring. If you’re into historical sewing recreation and you like Victorian-era fashions, Turano’s books are like a goldmine of inspiration. Think cascading bustles, elegant rows of buttons on bodices, and lacy parasols.

My favourite book so far is A Match of Wits, the fourth book in the Ladies of Distinction series, although the entire series is really good!


5. Laura Childs

“Pungent, orange-red Assams. Smoky, slightly sweet Ceylon teas. Fragrant Darjeelings from the steep slopes of the Himalayas. There were also sparkling emerald green teas from Japan, gyokos and senchas, that were a touch puckery and a bit of an acquired taste.”

Shades of Earl Grey


bookcover Death by Darjeeling by inspiring author Laura Childs on iPad surrounded by bone china teacups and wildflowers

And lastly, we will end this list of inspiring authors with Laura Childs, whom I just started reading last year. Specializing in cozy mysteries, Childs has written many murder mystery series, all of which have a theme. I’ve dabbled in her Tea Shop Mysteries, and they are so sweet and loveable! Those are perhaps not words one would associate with murder mysteries, but the Tea Shop books are as cozy as cozy can get! The puzzles are rather easy to solve, but the ride to the end is really fun, and filled to the brim with delicious tea tidbits, tea recipes, steaming tea pots, and pretty tea cups.

The stories are set in modern-day Charleston, South Carolina, and drip with loveliness, historic district charm, and all things tea. If pretty bone china, soft pastels, and dainty sandwiches are your aesthetic, you will love these books! The main character, Theodosia Browning, owns the Indigo Tea Shop, a picture-perfect spot that always ends up at the center of the action. Featuring delightful characters, intriguing mysteries, and endless cups of tea, these are the books to read for an ultimate cozy experience. As an added bonus, tea recipes are included at the end of each book!

bookcover of the English Breakfast Murder by inspiring author Laura Childs on iPad surrounded by bone china teacups and wildflowers

So put the kettle on, dust out your vintage tea set, and invite a friend or two to sample your freshly-baked lavender-laced scones. These books will get you inspired to bake and cook and drink lots and lots of tea, guaranteed!

I’ve read the first four books of the Tea Shop Mysteries so far and enjoyed them all, but I’d say Death by Darjeeling and Shades of Earl Grey were my favourites so far.

stack of books by inspiring author Georgette Heyer with bone china teacup and porcelain figurine of two lovers on a settee


Thank you for joining me!

I hope that between dreamy tea parties, Victorian fashions, Regency ballrooms, Louisa May Alcott’s wholesome portrayal of simple life, and Montgomery’s breathtaking nature descriptions, you will find a little something to inspire you! Whether it’s trying out something new or re-imagining something you already do, may the various inspiration from these authors bring you joy. I hope you enjoyed this post, and I’d love to hear your thoughts in the comments. Have you read any of the books I mentioned? Did you also find them inspiring? What other books/authors would be on your list of inspiring reads?


Happy reading my friends!


Fondly,

fresh inspiration - 5 authors to read
Pin to save for later!

Garden Bouquet PART 1: A Most Ambitious Project

July 31, 2021      Anne      Leave a Comment

Dear friend, are you ready to embark upon a serious embroidery endeavour with me? I have here, sketched, planned, and transferred, the most ambitious embroidery project I’ve ever attempted: a beautiful garden bouquet. I’m equal parts nervous and excited about it. It will feature techniques I haven’t tried yet, some tried-and-true favourites, and of course, loads of beautiful flowers!


A Garden Bouquet Embroidery Project


Let’s go on a garden tour and I will show you the inspiration behind the pattern. I suggest you put on your best hat and gloves, and you mustn’t forget a basket for you will surely wish to pick a few blooms for yourself. 😉 We are going to visit my grandmother’s garden.


red rose
What’s a grandmother’s garden without a rose?


catnip flower bed
A big patch of catnip of the prettiest purple


white peonies bush
The peonies this year were particularly impressive


close-up of a white peony


flowering wild rose bush
And just look at this wild rose tree!!


A Garden Bouquet


The title of this piece is “Bouquet du Jardin Turenne”, which is French for “Turenne Garden Bouquet”. As far as I can remember, my grandparents have always had the most beautiful garden. My childhood memories are full of colourful flower-beds, well-tended and orderly, where butterflies swirl and birds chirp. I remember being sent to pick currants with my brothers and cousins, and I remember the smell of thyme and fallen rose petals.


cluster of pink wild roses

My fondest memory of the garden however, has to be the raspberries. On either side of the house, there grows the biggest, juiciest and most perfect raspberries of all. They are truly unequaled. And there was always such a quantity of them!


Sketching the Design


Such happy, wonderful moments were spent in my grandparents’ garden. I have many cousins, and we all cherish fond memories of outdoor fun and botanical lessons. My grandparents recently celebrated 55 years of marriage, and although my gift will be late, I really wanted to make something worthy of the occasion. The idea of an embroidered bouquet inspired by their garden had been brewing in my mind for a while, and in fact I started sketching the piece about a year ago.


garden bouquet sketch with selected dmc threads and Gone With the Wind pouch


If you know me, you know I will tell you I’m no sketcher. I belong to the race of those “who can’t draw”. But as all the experts say, anybody can draw. You just need a lot of patience and determination. Well, this is no Mona Lisa, but I’m really proud to say that after many efforts, endless erasing and frustration, I managed to sketch this entire design by myself. I had recourse to Pinterest for reference images, but I actually drew the whole thing! I’m so happy with this achievement. Even if the embroidery completely fails, I will be proud of this at least!


close-up of the garden bouquet final sketch


Picking the Flowers


Choosing which florals to include was a massive task. I began by recruiting my mom to help me make a list of as many flowers as we could name from the grandparents’ garden. There have been A LOT over the years. I wanted the bouquet to represent the most staple specimens of the garden, while also staying balanced. For this reason, an apple tree branch was painstakingly drawn and unfortunately erased. I wanted to feature some of my favourites from the garden, as well as elements I knew were also special to my grandparents.


sketchbook page showing garden bouquet embroidery pattern


Therefore, our final contestants were the wild roses, the raspberries, the day lily, the currants, and yellow daisies. I began to realize, as I sketched and pondered that nearly all the elements I wanted to include were similar colours; pink roses, red raspberries, red currants, pink lily. It needed a splash of yellow so I added the daisies at the end. Originally I envisioned the lily orange, but Mom assures me that there never was an orange lily in my grandparents’ garden (I must have confused it with ours). So light pink it will be.


dmc embroidery thread in various shades of pink; stitching accessories - needles, snips, thimble


How to Begin Such a Project

The overall size of the bouquet isn’t very big, approx. 9 1/2″x 8″ and just fits in a 10 1/2″ hoop (the title is too close to the hoop edge, but that’s ok), but there are many elements fairly close together. As I mentioned earlier, I will use different techniques to embroider, so I think the best way to proceed is to break it down into sections. Ideally, it’s best to work back to front; you start with the elements the most in the background, and build onto it. That way, you achieve a more natural effect.

Since many of my flowers and leaves overlap each other, I’ve decided to work on it one species at a time instead. It will be less confusing to organize and keep track of threads, and I won’t have to switch techniques continuously.


Transferring the Pattern

Once I was happy with my sketch came the fun part of transferring the design onto my fabric. I chose a nice, thick off-white cotton with a broad enough weave to support some ribbonwork. Unfortunately it was rather hard to mark with the pencil! I normally make a copy of my pattern by tracing it with a fine Sharpie on a piece of tracing paper. Then I use a lightbox and a mechanical pencil to transfer the pattern onto the fabric.


garden bouquet embroidery design traced onto tracing paper


It did work and overall the markings should be satisfactory enough, but a heat-erasable or water-soluble pen might have been useful to go over some lines. Thankfully, the main outlines and positions of all the flowers and leaves are visible, so that’s all that really matters. It’s usually better to have fewer markings on the fabric than too many. If you look at my original sketch vs. what I transferred to the fabric, you’ll see that all the little details are missing.

garden bouquet sketch close-up
pattern transferred onto the fabric
This is a terrible photo, but it illustrates my point lol

That’s intentional, because not only is it really hard to get fine, precise lines transferred on fabric, but it’s also a bit of a waste of time, because all those details are added at the end usually on top of existing stitches. So I like to include details in my sketch for reference, but on the actual fabric, the needle and thread will do all the work 😉.


Up next: The Wild Rose

close-up of a pink wild rose


I will be starting with the branches of wild roses, since they will be the most time-consuming. I’ve pulled out as many shades of pink as I could find, and I’ll be working them in long & short stitch to achieve the art needlework effect.


close-up of garden bouquet sketch showing branch of wild roses


I’m really excited, and I can’t wait to show you the result! Stay tuned for the next instalment of this Garden Bouquet project, as the roses bloom and we can admire them together. Thank you so much for joining me on my needlework adventures!


Check out these other posts if you like floral embroidery with a vintage vibe:

ripening raspberries embroidery & pressed botanicals project
lilacs of love inspiration from jane eyre
wisteria embroidery inspired by The Enchanted April


And I’ve got a FREE embroidery PDF pattern for you as well if you haven’t grabbed it already: Wisteria PDF Embroidery Pattern, or check out my new Etsy shop!


Happy stitching and until next time!

Fondly,

Garden Bouquet Embroidery Part 1
Pin to save for later!

Wonderful Tips for Embroidery & Home Decor

July 23, 2021      Anne      Leave a Comment

Hello friend! I have some exciting news today!

The Diary of a Northern Belle was featured in a recent blog post article by Redfin. It’s all about how you can easily incorporate embroidery in your home in many different ways to enhance your space and give it that something special. 23 experts each provided their best tip on how best you can achieve this. This was a very exciting opportunity for me and I was very honoured to be able to contribute to the article! My tip is the very last one, so make sure you read the full article to see it 😉

Check out the recent Redfin article I was featured in:


Showcase Embroidery in Your Home: 23 Unique
Embroidery Ideas to Elevate Your Space


“The appearance of needlework in home decor is a definite sign that embroidery is making a
comeback. While it’s often thought of as a pastime reserved for your grandparents, we’re here to
tell you that needlepoint is enjoying its resurgence as a newfound hobby and collector’s item.
With a needle, thread, and a little creativity, embroidery can quickly transform your space and
allow your personality and imagination to shine through.


If you’re ready to get crafty and want some ideas to add a homey touch to your loft in New York,
NY
, or decor inspiration for your cozy home in Toronto, ON, we’ve got you covered. Redfin
reached out to us and other embroidery experts to get our unique embroidery idea to reinvigorate
your space. So bust out your embroidery hoops and colorful threads to add some flair to your
home.”


Showcase Embroidery in Your Home: 23 Unique Embroidery Ideas to Elevate Your Space

basket of roses embroidery to elevate home decor


I hope you enjoy reading the article on the Redfin blog page and that you will discover a new useful tip or two on how to decorate your home with embroidery! There are so many ways to go about it, but the article really breaks it down into a bunch of useful tidbits.

A huge thank you to Hannah Tan from Redfin for reaching out and featuring my blog in the article! 🙂 I really appreciate the opportunity, and to be up there with the other experts! Woo 😀

Happy home decorating, and stay tuned for more embroidery ideas and inspiration here on my blog!

Fondly,

Ripening Raspberries: Embroidery & Pressed Leaves

July 17, 2021      Anne      2 Comments

Let’s go berry-picking together, shall we? My embroidered raspberries are ripe and ready to be plucked! I had so much fun working on this week’s project. I’ve been playing with combinations of pressed botanicals and embroidery over the last few months, and I LOVE the results! I think they go so well together. It’s also much faster to finish a project since you save on embroidery time!


raspberry embroidery beads and pressed leaves


I don’t think a summer goes by where I don’t eat a copious amount of raspberries, even if it’s the store-bought ones. They’re one of my favourite fruits and it doesn’t feel like summer without them! Unfortunately this year, our red raspberry bushes only produced about five berries. ☹ They’re supposed to produce twice, so fingers crossed for the end of summer/beginning of fall. On the other hand, our black raspberry bushes were incredibly generous for their size! We didn’t have quite enough to bake desserts or make jam, but there was enough to stuff my face whenever I went out to pick them 😉. They’re smaller and firmer than red raspberries, but they’re really good, especially when picked under the warm sun.


black raspberries in nature


Ripening Raspberries


To fill the void left by the absence of red raspberries, naturally I had to embroider some. There’s an abundance of wild raspberry bushes at the edge of the woods on the way to the forest (which don’t produce much fruit either), and last spring I gathered a lot of leaves. Some were left to dry to make tea blends, and others were pressed with every intention of using them in such a project as this at some point. I really love the idea of combining embroidery and pressed botanicals in the same project!


flat lay view of raspberry embroidery finished piece, pressed raspberry leaves and teacup filled with black raspberries


The vision in my head was that of a branch laden with juicy berries and beautifully pressed leaves. I knew I wanted to use beads to make the raspberries sparkle. So I got my herbarium and my sketchbook out and began to design…


finished raspberry embroidery piece with red thread


Embroidered Raspberries ~ My Creative Process


1. Designing the Pattern

rough sketch for raspberry embroidery pattern


Confession: I don’t like designing. The sketching of what I want is my absolute least favourite part of the whole process. I’ve never been very good at drawing, so I find it frustrating not to be able to reproduce the wonderful idea in my head on paper. I’m working on it and trying to sketch more to get better, but it can be a real struggle sometimes.

Fortunately, you don’t need a great sketch to produce a beautiful piece of embroidery. The needle and thread do all the work. In fact, you really just need a rough outline of what you want to stitch. And I didn’t even have to worry about the leaves since I wasn’t going to embroider them. All I had to plan was their placement (which ended up changing anyways!). So anyways, step 1 is to sketch/plan where you want each element to go. As you can see this is a super rough sketch, but it’s all I needed for this project, thankfully.


2. Transferring Pattern on Fabric

raspberry pattern transferred on muslin fabric


I chose a piece of muslin for this project, because it’s a bit thicker and sturdier than my usual go-to factory cotton or linen. I knew the berries would end up being a little heavy with all the knots and beads, so I chose something more suitable than thin cotton. The off-white colour was also perfect for the colour scheme I had in mind. I used my lightbox and a mechanical pencil to transfer my design from my sketchbook to the fabric. Again, all I really needed was the main branch, a few stems and peduncles, and I just drew circles where I wanted the berries to be. The fewer markings on the fabric, the less you have to cover with thread later if you change your mind about something. I made the berry outlines smaller than their intended sizes to ensure they would be fully covered.


3. Choosing Thread Colours (and other materials)

embroidery threads and seed beads chosen to embroider the project


I had already picked some pressed raspberry leaves and played with them in Step 1 to determine where they would go on the finished piece, but there were still the threads to be chosen and the beads to find. I didn’t go out of my way to get anything specific and just used what I already had on hand. Consequently, I dug around in my floss box for thread that looked raspberry-coloured and found some slightly darker than what I envisioned, but still suitable. They’re from an unknown source (I have a lot of random thread bits in my box!) but their closest DMC matches could be #304 (Christmas red medium), and #777 (very dark raspberry). For the branch, peduncles, and sepals I used #937 and #3347. And finally, I located the perfect beads, a tiny bag hidden away with just enough for my project!!


4. The Stitching: Branch & Peduncles

embroidery in progress: main branch and stems


The first thing to embroider was the main branch and the little peduncles, since they are the elements the most in the background. I stitched a short stem where I knew I wanted to place a pressed leaf that didn’t have a stem. Near the bottom of the branch I left my pencil marks, since the leaves going there did have a stem already. I didn’t embroider the little thorns at this point, just the main outline. I used a split stitch and DMC #937, and made certain areas look “thicker” by doing two rows. This was to make the branch look more natural and less uniform. I stitched everything using two strands of thread, unless otherwise noted.


5. Embroidering the Raspberries

first embroidered raspberry with french knots
embroidered raspberries in french knots


Normally, the leaves would be next, but since they’re not embroidered, they will be placed at the very last, otherwise they will certainly break as I manhandle the hoop to get the berries done. So berries it is instead! I used French knots first, starting with #304 and ending with #777. I didn’t completely fill the areas to leave a bit of space for the beads. Once I was satisfied with that and each berry was filled with French Knots, I added a few more details to my branch.


6. Branch Details

straight stitches along the main branch for thorns

I did a few straight stitches using only 1 strand of thread along the main branch to represent the thorns (still in DMC #937). I also stitched the little sepals on top of the raspberries in lazy-daisy stitches using DMC #3347.


7. Adding Beads

embroidered raspberries close-up showing the beads used to add detail


Once that was done, I went back to my berries to add the beads! This was definitely the most exciting part of the project!! I used seed beads; some red, and others in this iridescent pink and red with touches of yellow. I’m so happy with the result of this!! I used silk sewing thread (not necessary, but the colour was the closest match to the berries). The seed beads are pretty small, so I needed a beading needle to be able to stitch them on. They’re long and have a very thin shaft so that the beads slide through no problem!

I stitched my beads on very randomly, switching between the two kinds and adding them where I had left space in between my French knots and in other little spots where it looked like one was needed. I absolutely love how ripe and juicy they look!! Beads really make such a difference in embroidery, I love it!


8. Adding the Leaves

pressed raspberry leaves glued on with elmer's glue and paintbrush


And now for the finishing touch – the leaves!! I ended up adding more than I originally planned and slightly changed the placement of some, but I’m SO happy with the result!! I added another little 3-leaf cluster at the very top and love the effect. Its leaves weren’t pressed completely flat, but that small detail adds a bit of dimension to the piece. I’m so glad I pressed a few of those! I had many larger leaves, but only two smaller clusters. I used Elmer’s transparent school glue and a paintbrush to glue the leaves to the fabric. I’ve tried this before with other pressed florals and it seemed to work, but if anyone knows of a better way (or better glue) to do this, please let me know!


close-up of finished piece
close-up of embroidered raspberries and pressed leaves


Finishing the Piece 

Now I just need to find a good way to frame/display the piece that will protect the dried flowers! Again, suggestions welcome. It’s a bit tricky because the leaves are flat but my berries are pretty 3D. I fear a glass frame would crush them. A shadow box might work? I shall have to experiment a bit and figure something out :). There has to be a good solution to this.


full view of finished piece
side view of finished piece
finished embroidery work with black raspberries
I managed to find TWO red raspberries for my photos LOL!


I hope you enjoyed this behind-the-scenes look at how I embroidered my raspberries! What do you think of the embroidery/pressed leaves combination? I’m hoping to make more of this sort of thing in the future – maybe next time I’ll use pressed flowers and embroider the leaves. I know I’ll most definitely be using beads again, they add so much charm and life! I fell in love with beads and embroidery when I worked on my Loving Lilacs Inspired from Jane Eyre, and I knew I had to try it again. My next project involving beads will probably feature blackberries…the time for picking them is fast approaching and those bushes are looking much more generous than the raspberries! 😉


Thank you so much for reading my blog and I wish you a lovely day! You can also find me on Instagram and Etsy!

Fondly,

ripening raspberries: an embroidery project
Pin to save for later!

  • « Go to Previous Page
  • Page 1
  • Page 2
  • Page 3
  • Page 4
  • Page 5
  • Go to Next Page »

Primary Sidebar

Recent Posts

  • Floral Garden Bunting Project: a Wrap-Up on the 2023 Stitch-Along
  • Fall Floral Embroidery Pattern: Calendula Wreath
  • “Embroideries From an English Garden” by Carol Andrews – Book Review
  • Botanical Wreath Project: A Pattern for Each Month
  • 2023 Free Yearly Stitch-Along + Mini Needle-Painting Tutorial

Welcome

photo of Anne-Marie from The Diary of a Northern Belle

Hello I'm Anne! Welcome to my little corner of the Internet where I share my passion for hand embroidery with you through tutorials and patterns. I hope that you enjoy browsing and leave with some new inspiration!

Archives

  • January 2024
  • November 2023
  • August 2023
  • February 2023
  • January 2023
  • November 2022
  • October 2022
  • August 2022
  • July 2022
  • June 2022
  • May 2022
  • April 2022
  • March 2022
  • February 2022
  • January 2022
  • December 2021
  • November 2021
  • October 2021
  • September 2021
  • August 2021
  • July 2021
  • June 2021
  • May 2021
  • April 2021
  • March 2021

Blog Archive

Categories

~ Diary of a Northern Belle

Northern Belle Atelier is taking a break 🌸💖 Northern Belle Atelier is taking a break 🌸💖

Today (Feb. 09th) is the last day to place your order for any physical items in my shop (kits, needle minders, or finished works). I will be removing the listings over the weekend. PDF patterns will remain available for now, but they may be taken down at any time (so if you've had your eye on one, I suggest grabbing it before they're gone! 🥰).

I will also be tuning off Instagram in the coming days, but you can still reach me via my business emails if you need. My blog will remain up for the time being. 💕

Thank you ever so much for all the support you've shown my little business since I began sharing my embroidery here! It has meant so much to me to be able to do this, even if just in a small way. 💖🪡 Wishing you all some beautiful stitches ahead!

Anne
Xoxo
February Wreath aka "Victorian Valentine" pattern February Wreath aka "Victorian Valentine" pattern from last year 💖🌸🎀 I love this one so much and it's perfect for Valentine's Day coming up!

Find it in my Etsy shop 💜

(Sorry for the shaky video!!)
Needle minders will be leaving my shop soon!! 🍒 Needle minders will be leaving my shop soon!! 🍒 Snag a cute little fruity needle minder for your next embroidery project before February 9th! All remaining needle minders in my shop are 10% off until then 💕🍓🍒💛
✨️ IMPORTANT UPDATE ✨️ I will be disconti ✨️ IMPORTANT UPDATE ✨️

I will be discontinuing embroidery kits from my shop very soon, but I still have 2 left of this pretty summer wreath up for grabs!! 🌼🍓

I love this design and the kit comes with everything you need to make the project: two pieces of cotton fabric, thread card loaded with DMC floss, two needles, a good quality 6" hoop, and the PDF pattern! All presented in a handy folder to make it easy to keep everything together 🤍💛❤️

Visit my Etsy shop (linked in bio) if you're interested!! They won't be around for long!
Thank you so much for all the love on the Floral G Thank you so much for all the love on the Floral Garden bunting!! 💖🌷🌻 Following several inquiries from some of you who were missing some or all of the patterns from this project, I've decided to link them in a handy-dandy blog post for easier access! 💕 I've linked it via my bio if you want to have a look and get the patterns! I like to give my subscribers a bit of exclusivity, but since this project has now come to a close, I've decided to make it available to everyone. 🥰

I may also have taken that opportunity to write a bit about each flower, the inspiration behind the designs, and of course their meanings according to the Language of Flowers 😊🌿🌻 If that sounds of interest to you, read  the post to find out more! I've also linked some stitch tutorials that may be helpful. 

Happy stitching! 🎀🪡🌼

Anne
The Floral Garden stitch-along has come to a close The Floral Garden stitch-along has come to a close and the bunting has been sewn and hung! 🌻🌷🌿 what a joy it was to work on throughout the year, and I hope you've enjoyed it too! I'm thrilled with the final result 😍

Thank you so much for all the lovely comments and enthusiasm for this project. I've just sent the final instructions + bunting template to my email subscribers 💌 it isn't too late if you'd like to give this project a try - you can sign-up via the link in my bio and receive the links to all 12 floral motifs from last year + the instructions for the bunting!! 💕

The embroideries are beginner-friendly and perfect if you want to try a bit of needle-painting, and the bunting part is quite easy and quick to put together (compared to last year's mini-quilt haha!) 🌷💕🌿

Happy stitching!!
Winter Fox 🦊🤍🌲 I think this makes the fir Winter Fox 🦊🤍🌲 I think this makes the first completed embroidery for 2024! Absolutely loved working on this and love the mix of watercolor with embroidery! Can't get enough of the little pinecones 🤎
Follow on Instagram

Copyright The Diary of a Northern Belle © 2025 · Wordpress Theme by Hello Yay!

We use cookies on our website to give you the most relevant experience by remembering your preferences and repeat visits. By clicking “Accept”, you consent to the use of ALL the cookies.
Cookie settingsACCEPT REJECT
Manage consent

Privacy Overview

This website uses cookies to improve your experience while you navigate through the website. Out of these, the cookies that are categorized as necessary are stored on your browser as they are essential for the working of basic functionalities of the ...
Necessary
Always Enabled
Necessary cookies are absolutely essential for the website to function properly. These cookies ensure basic functionalities and security features of the website, anonymously.
CookieDurationDescription
__cfduid1 monthThe cookie is used by cdn services like CloudFare to identify individual clients behind a shared IP address and apply security settings on a per-client basis. It does not correspond to any user ID in the web application and does not store any personally identifiable information.
cookielawinfo-checbox-analytics11 monthsThis cookie is set by GDPR Cookie Consent plugin. The cookie is used to store the user consent for the cookies in the category "Analytics".
cookielawinfo-checbox-functional11 monthsThe cookie is set by GDPR cookie consent to record the user consent for the cookies in the category "Functional".
cookielawinfo-checbox-others11 monthsThis cookie is set by GDPR Cookie Consent plugin. The cookie is used to store the user consent for the cookies in the category "Other.
cookielawinfo-checkbox-necessary11 monthsThis cookie is set by GDPR Cookie Consent plugin. The cookies is used to store the user consent for the cookies in the category "Necessary".
cookielawinfo-checkbox-performance11 monthsThis cookie is set by GDPR Cookie Consent plugin. The cookie is used to store the user consent for the cookies in the category "Performance".
viewed_cookie_policy11 monthsThe cookie is set by the GDPR Cookie Consent plugin and is used to store whether or not user has consented to the use of cookies. It does not store any personal data.
Functional
Functional cookies help to perform certain functionalities like sharing the content of the website on social media platforms, collect feedbacks, and other third-party features.
Performance
Performance cookies are used to understand and analyze the key performance indexes of the website which helps in delivering a better user experience for the visitors.
Analytics
Analytical cookies are used to understand how visitors interact with the website. These cookies help provide information on metrics the number of visitors, bounce rate, traffic source, etc.
Advertisement
Advertisement cookies are used to provide visitors with relevant ads and marketing campaigns. These cookies track visitors across websites and collect information to provide customized ads.
Others
Other uncategorized cookies are those that are being analyzed and have not been classified into a category as yet.
SAVE & ACCEPT
Powered by CookieYes Logo