• Skip to primary navigation
  • Skip to main content
  • Skip to primary sidebar
  • Home
  • About
  • Contact
  • Privacy Policy
  • Disclosure
  • Terms of Service
  • Nav Social Menu

    • Email
    • Facebook
    • Instagram
    • Pinterest

The Diary of a Northern Belle

Hand Embroidery

  • Stitch Library
  • Learn Embroidery
    • All posts
    • For Beginners
    • Stitch tutorials
    • Tutorials & How-To’s
    • Join a stitch along
    • Book Reviews
  • English Paper Piecing
  • Kits & Patterns
    • PDF Patterns
    • DIY Kits
    • Botanical Wreaths
  • Stitch Along
  • Blog
  • Freebies
  • Shop

THE LATEST

Floral Garden Bunting Project: a Wrap-Up on the 2023 Stitch-Along

Fall Floral Embroidery Pattern: Calendula Wreath

“Embroideries From an English Garden” by Carol Andrews – Book Review

Techniques

Awesome Bullion Knot Hack

June 22, 2021      Anne      6 Comments

Who here hates bullion knots? There’s absolutely no shame. They are a beast.

bullion knots made easy

I used to not even like the finished look of them, but I do know. They’re amazingly textured and three-dimensional and really bring the embroidery game to the next level. BUT.

THEY ARE SO ANNOYING TO STITCH.

Admittedly, I haven’t tried very hard. I have a skin condition called hyperhidrosis that makes me sweat from the hands uncontrollably. It’s like having a faucet that never turns off. It doesn’t matter if it’s cold and I’m at my most relaxed, I will still sweat. This makes embroidery very difficult sometimes, but it makes certain stitches pretty much impossible. The bullion knot is one of them. It can be hard enough for dry-handed stitchers, but with sweaty hands, boy oh boy! I don’t recommend AT ALL.

So needless to say, I gave up pretty fast when I tried it. I was also in a huge rush, because the project I was working was a Christmas gift and Christmas was coming SOON. I picked a project that had about 300 bullion knots and I had never worked with them.

Why did I do this to myself, you ask? Great question.

To be fair, I didn’t count them beforehand. I honestly didn’t think it could be that bad, and I really wanted to stitch the beautiful lilac branch from Carol Andrews’s Embroideries From an English Garden. I also like a good embroidery challenge. (You can find the full blog post on this project and its inspiration from Jane Eyre here.)

flat lay view of embroidered lilac branch journal cover
close up of embroidered lilac flowers and beads

But after spending 15 minutes on one bullion knot with my sweaty hands that made the thread impossible to glide through the coil, I was ready to give up. I seriously considered stitching the lilac flowers in a completely different way. But after playing around for a bit, my sweating intensifying with every passing second as Christmas drew closer, I found an incredibly easy way to achieve the bullion knot look without actually stitching a bullion knot.


Amazingly Easy Bullion Knot Hack

Alright, so the traditional way to make a bullion knot is to wrap your thread several times around the needle shaft, tightening it with one hand to create a coil, and then pulling the needle through the coil with your other hand. It’s a stitch that takes a lot of practice, but it’s definitely possible and the results are worth it. But sometimes, sometimes you just can’t. And that’s okay, because there is ANOTHER WAY. A MUCH, MUCH EASIER WAY.


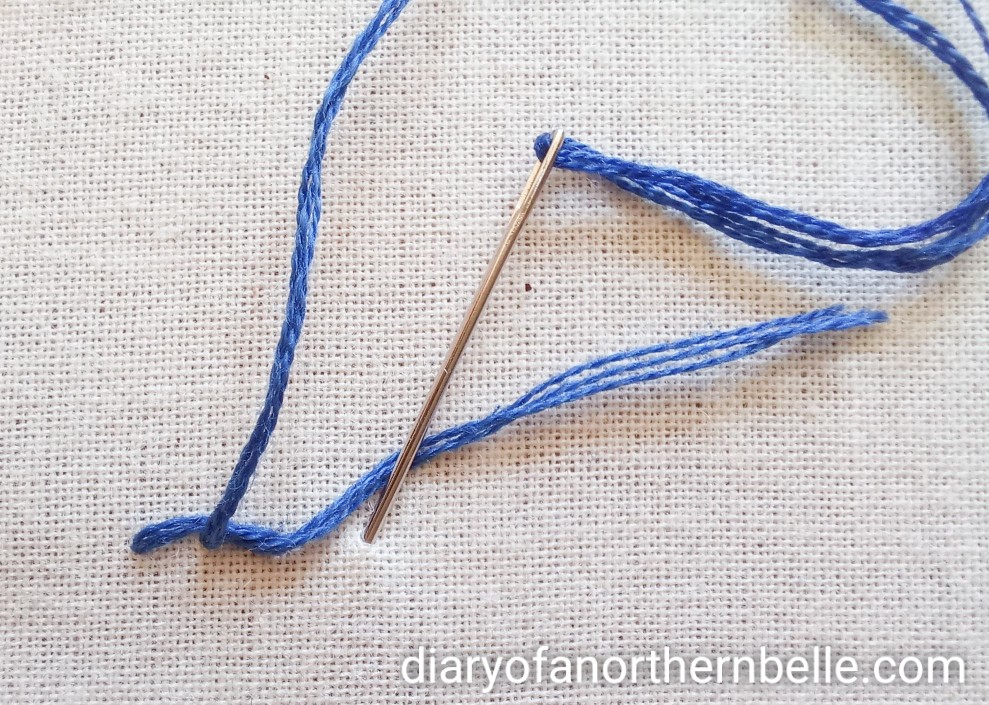
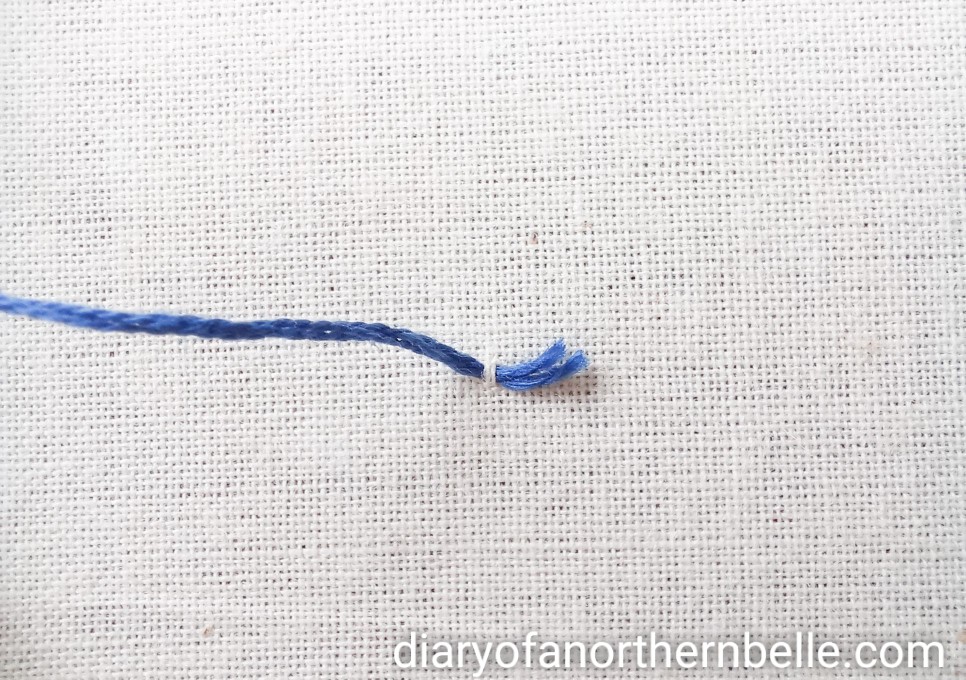
Begin by threading your needle and see this post on how to best anchor the thread to begin your stitches. Once you’re ready, bring your needle up from the back and make a straight stitch the size you want your bullion knot to be.

straight stitch


Come back up in the same hole (or very near) where you first came up to make the straight stitch (point A).

needle coming back up at point A


And this is where the magic happens. Slide your needle under the straight stitch and wrap your thread around it repeatedly, until it is all covered. Wrap it tightly, and guide it with the tip of your needle if need be (sometimes the wraps tend to pile on top of each other).

needle gliding behind straight stitch
needle wrapping around straight stitch for bullion knot hack
bullion knot hack in progress


When you get to the end, go back at point B, either in the same hole or just besides (it’s a bit more secure to go just besides).

going back down at point b to close the stitch


Sometimes the bullion knot will be a little loose from all the wrapping, but that’s ok. Place it however you want it to lay, and make a small anchoring stitch in the middle to hold it in place. It’ll blend in with the wraps.

finished bullion knot laying flat
bullion knot hack complete


AND THERE!!!! Isn’t this so much easier than the traditional method? And it LOOKS THE SAME, but it’s so much less aggravating!! No one needs to know it’s not an actual knot. 😉 This is the method I used for my lilac branch project and it worked so well and I was so pleased with the result!!

lilac branch project bullion knot lilac flowers close-up


What do you think? Are you a fan of bullion knots in general? Leave me a comment if this tutorial was helpful to you!

Fondly,

super easy bullion knot hack
Pin to save for later!

FREE Embroidery Pattern & Tutorial: Wisteria Branch

June 12, 2021      Anne      4 Comments

Who’s ready for a hand embroidery pattern freebie? 🙂


embroidery freebie wisteria

Read on to download this sweet wisteria embroidery pattern & see the tutorial. 🙂 Last week, I introduced you to one of my new favourite novels, The Enchanted April, by Elizabeth von Arnim. We talked about how dreamy and escapist it was, and how much flower inspiration there was to be found in it. The wisteria in particular, proved to be a wonderful subject for embroidery!


If you haven’t seen that post, check it out here.


I showed you a bit of how I embroidered my wisteria-inspired project, and if you liked it then the good news is that I have more wisteria for you this week!


embroidered wisteria branch finished side view
embroidered wisteria branch finished view from top


I created this pattern so I could share my newfound love of wisteria with you all. Now you can stitch your own! May it bring you sunshine and happiness as promised in The Enchanted April.


The pattern is super simple and accessible to beginners. I only used three basic stitches: the split stitch, the lazy-daisy stitch, and a form of leaf stitch. Simply click on any of these for a full tutorial on how to work them.


See also: The Only Embroidery Tools You Really Need to know which basic materials you will need for this project.


DOWNLOAD YOUR PDF HERE: Wisteria Free Embroidery PatternDownload


Tutorial:


I used DMC floss, but you can use another brand if you like. You can find a good conversion chart here. I used 2 strands throughout the whole project.


#153 (Vy Lt. Violet)

#210 (Md. Lavender)

#470 (Lt. Avocado Green)

#553 (Violet)

#3011 (Dk. Khaki Green)

#3042 (Lt. Antique Violet)


See also this post on How to Start & End Your Stitches.


1. Branches


Begin by stitching the branches (or stems?) with #470 . Since the leaves and the flowers will go over it, it’s easier to start with it first. I used the split stitch, but feel free to use any other outline stitch that you like, such as the backstitch or the stem stitch. Stitch all the way down the middle of the flower cluster. Some of it will show through once the flowers are stitched. You can also stop the branch before the cluster if you don’t want it showing through or you want to make your flowers very tight together.


wisteria stem in split stitch


2. Leaves


There are many ways to embroider leaves, but I kept it super simple here and just stitched mine with a simple leaf stitch. The method I use is kind of a cross between satin stitch and fishbone stitch. Using 2 strands of #470, make a small straight stitch from the top of the leaf to the top of the guideline running down the middle vein.


leaf worked in straight stitches


Work your way down the leaf by starting your stitches on the outline of the leaf and ending on the middle guideline for the central vein. Make your stitches at a diagonal angle to keep the shape of the leaf. I like to work one side at a time (usually I start with the right).


leaf worked in straight stitches one side at a time


If you’re satisfied with the look of the leaves as they are after this step, you can skip the next step! I just wanted to add a bit more colour and texture to mine.


Using #3011, make a straight stitch down the middle of the leaf for the main vein. I also added two very small stitches on either side, also on a slight angle.


view of finished leaves


3. The Flowers


The flowers are all worked in lazy-daisy stitches, sort of scattered in a downward motion and fairly close together to create the droopy cluster effect. On your pattern, the dotted line indicates the shape the finished cluster will take. You don’t have to transfer that line on your fabric as it may leave marks if it’s not entirely covered in stitches. It’s more just to give you an idea of the finished size and shape. You can transfer the straight lines going down from the stem, as those should be all covered and will help you to guide the placement of your stitches.


You want to work your lazy-daisies downward, some going straight down, and others going at slight angles from the branch. There is no specific placement for each of them though, and this is a very forgiving flower for embroidery. One stitch or two out of place will only add shape to it! Have fun with it and experiment with where you place your stitches if you want to change the shape a bit, or the way it hangs.


lazy-daisy stitches embroidered along wisteria branch to create flowers
wisteria branch being filled with lazy-daisy stitches to create the flowers


I used #153, #3042 and #210 for the smaller branch, and #153, #3042 and #553 for the bigger one.


finished embroidery work


And there you go! I decided to add a little bow at the last minute to give it a more finished look. I used a piece of narrow white satin ribbon, tied it into a bow and sewed it to the base of the branch.


view of little white ribbon bow at base of wisteria branch


It looks pretty cute I think! I really hope you have fun stitching this wisteria pattern. This is the first “real” pattern I’ve ever made so I’m pretty excited. Any feedback will be super appreciated and I would love it if you show me your results! Tag me on Instagram @northernbelle.atelier if you try this wisteria pattern! 🙂 Also don’t hesitate to reach out for any questions or comments and be sure to subscribe to my newsletter for more embroidery content!


Fondly,

wisteria embroidery free pattern
Pin to save for later!

Easy Chain Stitch Tutorial

May 28, 2021      Anne      Leave a Comment

Who’s ready to learn more stitches with me? Today, I’ve put together a tutorial on how to do the chain stitch and the detached chain stitch (commonly known as the lazy-daisy stitch). I absolutely love the lazy-daisy and use it all the time. So I’m excited to share it with you! Back in March, I wrote a post on the first 5 stitches you should learn as a beginner, and I definitely encourage you to have a look at it to learn the basics. Today’s tutorial also features an easy stitch, perfect for beginners and widely used in surface embroidery. So grab your needle and thread & let’s go! For a list of all the materials you need to get started with embroidery, check out this post.


chain stitch easy embroidery tutorial


First things first, you’ll need to cut some embroidery floss, about the length of your forearm. I will be using 3 strands of DMC #3818 throughout this tutorial, but feel free to use more (or less). Then, thread your needle and either knot the end of your thread or anchor it to the fabric using any of the methods detailed in this post (or any other way you know of starting embroidery)


The Chain Stitch


I’ll be honest, I really don’t use this stitch very often. I usually kinda forget about it. I really like it though, and it’s super easy. It just never seems to work with anything I’m stitching for some reason haha!


To begin, bring your threaded needle up from the back at point A. Pull the thread all the way through.


thread pulled all the way through at point A to begin chain stitch


Go back down in the same hole (A), and bring the needle up at point B in the same swoop. Don’t pull all the way.


needle going back down at point A
needle going back down in A and up in B


Pull the needle through gently, pulling until the thread forms a loop. Bring your needle through that loop, and pull through.


needle being pulled through point B
Pull the needle through until you get a loop big enough to go through it.
thread going through the loop to form chain stitch
Bring your needle through the loop.
loop being pulled down
Since point B is below point A, the loop will eventually be pulled down to lay where it’s meant to.


Sometimes you might need your other hand or the tip of your needle to help guide the loop, as it can have a tendency to twist and won’t lay properly.


first chain of the chain stitch complete
Pull the thread trough the loop until it rests nicely on the fabric.

Go back down into the same hole again, where your thread currently is (point B), and bring your needle up at point C. This is the same motion as before, when you started your first stitch.


needle going back through point B and up at point C
Go down B and up C before pulling the needle through.

Pull the needle and thread through until you get a loop of thread, just like in the previous steps. Make the sure the needle goes through and then pull all the way so the loop will lay flat.


second chain stitch being pulled through
two connected chain stitches laying flat


Keep repeating these steps until you have the chain length you want! Basically, you always go back down in the same hole you came up.


chain stitch in progress


To end the chain, simply take a small stitch on the outside of the loop to close it.


closing the last stitch


view of the last closed chain stitch

And there you go, that’s the chain stitch!


The Detached Chain or Lazy-Daisy Stitch


If I never use the chain stitch, I most certainly always use its detached version 😉. As you might have guessed, this is essentially a single link of the chain stitch. It’s commonly referred to as the lazy-daisy stitch, and will seem super simple after working the chain stitch!


Begin the same way as above. Bring your needle up from the back at point A. Go back down through A and up in B, pulling until you form a loop. Thread your needle through that loop and pull.


needle going down in A and back up in B
needle going through loop
thread being pulled through loop for chain stitch


Pull the loop down until it lays nice and flat.


loop being pulled down to lay flat
chain loop laying flat on the fabric


So far, that’s exactly the same as the chain stitch. If you wanted to continue the chain, then you’d go back down in the same hole again and keep going until you got the length you wanted.


But for the lazy-daisy, all you need to do is end the stitch there, as though you were finishing the chain length.


Take a small stitch on the outside of the loop to secure it.


small stitch on the outside of the loop to hold chain stitch down


And that’s it!


finished detached chain stitch


I can’t tell you how much I love that stitch. It’s so incredibly useful for leaves and flower petals. Plus it’s pretty quick to work!


I hope this tutorial was helpful to you and that you’ll enjoy working the chain stitch and its detached version. I tell you, the lazy-daisy can be such a lifesaver! I used it a lot in my Redwork Embroidery Box Project, and generally love it for small flowers and leaves.


the lazy-daisy stitch embroidery tutorial


Let me know if you have any more questions about it in the comments, or feel free to share the love for this stitch too 🙂


Fondly,

How to Start and End Embroidery Stitches

April 19, 2021      Anne      14 Comments

To knot or not to knot, that is a question that often seems to be heavily disputed in the embroidery world! One of the first things you want to know when you first begin embroidery is, of course, how to even begin. What are the proper ways to start and end your embroidery stitches? How do you secure your thread?

This post will answer all your questions about starting and ending off your stitches efficiently. I will go through a few different ways to do so, since certain stitches might require different methods.

Let’s begin with the famous question of whether or not it’s proper to start embroidery by knotting your thread…


To Knot or Not

When I first started learning embroidery a few years ago, I primarily turned to books to teach myself how to stitch. Most authors whose books I thoroughly enjoyed frowned heavily on the practice of using knots. But then again, others saw nothing wrong with it and told you to just go ahead and secure your threads with knots if that’s what your heart desired. After all, when all is said and done, no one looks at the back of embroidery, right? Who’s to know or care?


The Case For Knots

The truth is, it really depends on what you’re embroidering and what purpose the final piece will serve. Generally speaking, knots are less secure than the other methods I’m about to show you. They come undone easier, and if your piece is going to be washed repeatedly, you run the risk of having your beautiful stitches come undone.

They also add unnecessary bulk, and if you like the back of your embroidery clean, they make everything look messier. However. Sometimes a knot is just easier and makes sense. Sometimes you want to go a little faster, and sometimes you might get a little lazier. I’ll be the first to admit that I do that 😉

If you’re just practicing your stitches on a fabric scrap, or you know your piece will stay in the hoop and the back will be finished with another piece of fabric, then I really can’t blame you for wanting to use knots. I think they’re perfectly acceptable in certain cases, especially if you’re framing your final work.


How to Start With a Good Old-Fashioned Knot:

Begin by gathering the materials you will need for embroidery – you can find more information on that in this post. Prepare a piece of fabric and mount it in your embroidery hoop. Then, thread an embroidery needle. I used 3 strands of navy Anchor cotton floss for this tutorial.

Leave a tail of 3”-4” hanging from the eye of the needle (the eye is the hole where you thread).


threaded needle with hanging tail 3-4 inches long


Form a knot at the end of your main length of floss (not the tail). Pull to tighten, and snip off any excess thread.

thread end forming a knot
tight knot at the end of thread

Bring your needle up from the back of your hoop at the point where you want to start stitching. The knot will remain at the back of your work.


How to Start Embroidery Stitches Without a Knot

In the interest of showing you the “proper” way to start and end embroidery stitches for those pieces where knots at the back aren’t your best bet, here are some alternative ways to get started:


1. The Waste Knot

For this one, you will actually begin with a knot again, following the same instructions as above. However, instead of bringing your needle up from the back, you will do the opposite. Draw the needle from the good side of the fabric so that the knot rests on the front.


waste knot resting on the front of the embroidery work


Make sure that the knot is away from where you want your first stitch to be. If you have a guideline marked on your fabric, you want the knot to be slightly away from it, not on it.

Make two very small stitches along your guideline, in the spot where you want your first stitch to be. They should be small enough so that your first stitch will entirely cover them.


two small anchoring stitches to begin embroidery, away from a waste knot


Bring your needle up from the back just behind the first tiny stitch, and make your first actual stitch. For this tutorial, I’m doing a simple line of backstitch.

needle coming up behind two anchoring stitches to begin a line of stitching
needle coming down to cover anchoring stitches
first stitch laying on top of anchoring stitches, covering them completely


Take a few more stitches, and once you feel that it is secure, go ahead and snip the knot. Lift it gently with one hand and cut with the other.

line of backstitch with waste knot at the end
snips about to cut waste knot

The front is now all neat and tidy and you can carry on stitching!

view of neat front after waste knot has been snipped


Note: You don’t want to place the knot too far from your intended line of stitching, or you’ll end up with a dangling tail on the backside.


How To End Your Stitches Without a Knot

To finish off a line of stitching, simply flip your hoop to work on the backside. Run your needle just behind the stitches you’ve already lain. I usually weave it three or four times before snipping the end.

needle weaving through back stitches to secure end thread
end thread has been secured through stitches on the back ready to snip
neat view of the back once thread has been secured

And there you go! Nice and secure, no bulky knots!


2. Starting with a Long Tail

Certain stitches make it easier than others to forgo knots altogether. With this method, you start by bringing your needle up from the back, leaving a good tail of around 1”-1 ½” long at the back.


long tail at the back of embroidery hoop


The idea with this one is to catch the tail as you go along. Hold on to it with one hand as you take your first stitch so it won’t slip away. The next time you come up from the back, as you take your second stitch, make sure to catch the tail underneath it. As you pull your thread tight to lay the stitch, it will start securing the tail.


view of backside, as stitch begins to anchor the tail
View of back
view of backside showing stitch being pulled tight to secure tail
View of back

Repeat these steps a few more time to ensure the tail is really anchored, checking the back of your work to make sure you’re catching it.

more stitches anchoring the tail on the back side
Working on the back, make sure to trap the tail as you lay your stitches.


If you left a pretty long tail, you can eventually just snip it off once you feel it is secure, or you can keep catching it at the back until it is fully anchored.

back view showing anchored tail has been snipped off
View of back


Front will look all nice and tidy 😊

front view of tidy row of backstitch

Finish off the same way as illustrated in the waste knot method, by weaving the thread through the stitches on the back.


3. Starting With Anchoring Stitches


Alternatively, you can also make a few anchoring stitches to secure the thread when you start instead of catching the tail behind your first few stitches.

tail of thread on the back side
Tail on the back side
two small anchoring stitches on front side
Anchoring stitches on the front
back side view after taking two anchoring stitches, shows thread tail hanging loosely
Back side, after anchoring stitches are made

As shown before, cover the anchoring stitches with your first stitch. Continue stitching, catching the tail if you want, or snipping it if you feel it is secure enough.

needle coming up to cover anchoring stitches
Front
First stitch covering the two anchoring stitches, view of front
Front
View of the back, showing snipped tail once it's been secured
Back side, after more stitches were made. Tail has been snipped.

Finish the thread by weaving it behind the stitches on the back, the same way as before.


4. Anchoring “X” Method

This method is probably the fastest and easiest way to start embroidery, but it can end up leaving visible anchoring stitches on the front. It’s better suited for larger stitches or if you’re filling an area.

Working on the backside of the hoop, take a teeny-tiny stitch where you want your first stitch to lay, or inside a shape you will be filling. Catch only a fiber or two of the main fabric. Pull through, but not all the way. You want to leave a very small tail, only a few millimeters long.


needle on the back side picking up two thread of main fabric
Small tail left on the back side once first anchoring stitch has been made

Going back to the wrong side, take another tiny stitch just behind the first one, at an angle to form a little cross or an X.

on the back side, needle coming behind first anchoring stitch to make second anchoring stitch to form X with the first one


This is what it will look like on the front. It is a bit larger and can be harder to disguise with outline stitches, but it’s perfect for filling and for certain isolated stitches like French knots and lazy-daisy.

view of the front with small X formed by anchoring stitches


Here I’ve worked some French knots, and the first one sits right on top of that little anchoring cross, completely hiding it.

french knot sits on top of anchoring X
group of french knots worked on good side

How to End Your Stitches

Since French knots are often isolated, this method works really well to secure them. To finish off the thread, flip to the backside, and weave your needle a few times among the stitches.

backside showing dragged thread from french knots
needle running behind the stitches to secure the thread

You can see that I dragged my thread across a little, and while this isn’t always recommended, it’s perfectly fine for working isolated stitches that are still close to each other. Since the threads are a bit loose though, I recommend looping your needle through your working thread to make it extra secure. I also like to run the needle behind the back stitches once more before snipping off.

needle going through thread loop to form small anchoring knot
knot has been pulled tight to secure thread

It technically counts as a knot, but it gives me peace of mind that the stitches won’t come undone. You could also end the same way you began, with the little X, but make sure that it’s not visible on the good side. This can be tricky sometimes, depending on what stitch you’re working.


Best Way to Start & End Stitches if You’re Filling a Shape

I find it much easier to start embroidery if I’m covering an area rather than outlining, because any anchoring stitches/tails are sure to be hidden and extra secure.

 To begin, you can either use the waste knot or the hanging tail method. You’ll want the waste knot or the thread tail to be inside the shape. When you place your two anchoring stitches, they don’t have to be as close together as I’ve shown before. As long as they are inside the shape you’ll be filling, you’re good! They can also be bigger since they will be fully covered.


I’m using the waste knot method here, and after working a few long and short stitches, I just snip off the knot.

Long & short stitches being worked inside the shape to cover the anchoring stitches
Waste knot has been snipped off the good side of fabric

When you’re ready to end, flip to the back of your hoop, and simply run the needle through a few stitches. If you’re working long & short or satin stitches, they will be nice and tight and your thread end won’t be going anywhere anytime soon (unpicking these stitches is the worst, they are so secure!).

needle running behind stitches on the back side


If you’re switching colours or simply re-threading, you can begin again the same way you ended. Flipping to the back side, run your needle behind the stitches once or twice, until you can safely pull without the tail coming undone.

Repeat until your shape is filled to your satisfaction!

finished shape viewed from the front, worked in long & short stitches


And here we are, these a few ways you can safely start and end your embroidery stitches with no worries 😊 This turned out to be a longer post than I thought for what seems like a small thing, but these are the steps that will hold everything securely together, so it is important. And I just had to give my two cents on the whole knot-or-no-knot business 😉 I do hope this post was helpful to you, and if you know other methods of starting and ending embroidery that work well for you, please share them in the comments!


Happy embroidering my friends, and until next time!

Fondly,

Stitch Book to Practice Embroidery

March 25, 2021      Anne      Leave a Comment

I am so happy to present you my stitch book! It’s like a sort of physical version of the Diary of a Northern Belle. When I first got the idea for this blog name, I knew I’d have to embroider a little something to represent it. When I started the embroidery on the front cover, I intended it to cover the box I used in the Redwork Box Project. Then I thought it would be more appropriate to turn it into a little “diary” of sorts. A place where I could store pieces of fabric with practice stitches and half-finished projects. I had been meaning to sew myself a little book to practice stitches for a while now, but none of the styles I came across suited me. So I had to make my own! 

angled view of the finished stitch book, closed, showing the embroidered cover

The embroidery on the front cover features one of those vintage “Southern belle” ladies.  Except this particular one is northern, of course. 😉 There is also historical edging taken from an 1860s pattern, as well as some of my own design. My northern belle needed a pile of books and a warm cup of tea. And of course, adding titles and quotes always ties everything nicely together!

flat lay of the embroidered front cover of the stitch book, featuring a "Sounthern belle" lady on a bench with books and a cup of tea beside her, grass at her feet, and the words "Diary of a Northern Belle" stitched in cursive above her. In all four corners of the cover are stitched little red berries surrounded by a white scalloped edge.

close up view of the front cover embroidery; title "The Diary of a Northern Belle" stitched to represent cursive letters; the head of the Southern Belle lady, and the little berries decorating the two upper corners

The vintage pattern I used can be found here.


Touches of Historical Embroidery

The little branches of red berries found on all four corners of the front cover, and on the two upper corners of the left inside cover were taken from the embroidery section of the Ladies’ Handbook of Fancy and Ornamental Work. The copy I have is a 2016 unabridged reproduction of the collection by Florence Hartley. It was originally published in 1889 and features directions and patterns from the American Civil War era.

cover of "The Ladies' Handbook of Fancy and Ornamental Work" by Florence Hartley

The little berries can be found on p. 131, labeled “edging”. Edging patterns were used to add needleworked embellishment on various items such as handkerchiefs, collars, or skirt hems.

view of open page from the Ladies' Handbook showing the edging pattern used for the little berry motif

I really wanted to decorate the corners of my stitch book cover. So, I decided to embroider only one of the little motifs in each corner, and I really like the outcome! A full row would also look super cute, maybe around sleeve cuffs or a skirt hem.

close up view of the embroidered cherry motif

I actually contemplated embroidering a row of the little cherries on the right inside pocket. However, since the background fabric of the inside cover already featured very similar little berries, I thought it would be just a little too similar. I opted for the edging pattern on the same page that’s right above. It also looks like a berry, but is different enough from the fabric print.

closer view of edging patterns in the Ladies' Handbook to show the one that will be embroidered on the stitch book's left inside pocket

I decided to stitch the edging with colours that matched the background fabric of the inside cover. By making the berry white, it doesn’t so much look like a berry anymore.

close up of embroidered border on the inside pocket, featuring an edging pattern stitched in white and blue using Perle cotton thread

I’m also quite pleased with how it turned out, aside from the dramatic angle it took because I apparently can’t follow a straight line…. But the embroidery itself turned out quite well, I think! I tried Perle Cotton thread (no. 5, white) for the first time and I must say I rather like it. I’ve since been looking for a new project where I could use it in order to justify buying more. It gives it a sort of crocheted baby-blanket look, if that makes any sense at all.

view of open stitch book showing the embroidered border on the left inside pocket

The Ladies’ Handbook is a great resource so far, including patterns and instructions for various kinds of needlework. The embroidery section features a lot of detailed handkerchief borders and beautiful flower designs. I will definitely have recourse to it again in the future!

Embroidery Stitches

Specific instructions or stitch suggestions as to how to work the edging patterns are not provided in the Ladies’ Handbook. I decided to keep it fairly simple for this project. With the exception of the little hedgehog on the inside left pocket, the red berries, and some elements of the border on the right pocket, everything is done in outline stitches.  I mainly used the split and back stitches.

close-up of embroidered northern belle seated on a bench to showcase various stitches like the backstitch, splitstich, stem stitch and straight stitch

close-up of embroidered 1860s motif depicting a cherry branch, highlighting French knots, satin stitch, and lazy-daisy stitches

Some of the detail elements are done in satin stitch, lazy-daisy and French knots (which I plan on providing a tutorial for very soon). I’ve also used straight stitches for the grass on the front cover and the pine needles on the inside left pocket.

view of embroidered right pocket, featuring a pine branch with pinecones, and a little hedgehog

close up view of embroidered pine branch with pinecones

The little hedgehog and the pine branch emerged from little sketches I made. I kept being drawn to little woodland creatures and autumny, woodsy things while planning the project and wanted to find a way to incorporate some of them into the overall design. I worked the hedgehog in a sort of very unofficial needlepainting method with long & short stitches that didn’t always end up where I wanted them…

closer view of embroidered hedgehog

…but in the end it didn’t turn out too bad and I’m very happy with it!! <3


Making the Stitch Book

When I first got the idea of making a stitch book to practice my embroidery stitches, I knew that it would need “pages” of fabric to practice and experiment with stitches, but I didn’t want them to be attached to the book. I wanted to be able to add and remove them as I needed. That way, it’s much easier to mount a single piece of fabric onto the embroidery hoop rather than a piece of fabric attached to the stitch book. I also didn’t want all the pages to be predetermined and I wanted to be able to easily add new ones without having to sew them in each time.

open view of stitch book, showing dark blue ribbon threaded through book "spine"

So my solution to that was simply to thread a piece ribbon through the “spine” of the book. By tying it in a bow, I can easily add and remove fabric pages. 

flat lay view of open stitch book showing fabric pages attached to ribbon closure

And it works for attaching a fabric page of any size that isn’t overly bigger than the book itself, because smaller pages can be threaded through only one end of the ribbon and still remain attached.

close up view of open stitch book showing a small fabric page attached to ribbon closure

Plus, there are the two inside pockets too, if I need to stuff smaller bits or carry my snips and some floss.

flat lay view of open stitch pocket to show both left and right side pockets

The construction process was overall pretty simple. I did a bit of piecework on the front cover to frame the embroidery, and I used fusible interfacing to stiffen both the front and back covers, as well as the spine. The ribbon closure on the side keeps the book closed and matches the one on the inside.

flat lay view of front cover and small fabric pieces used to frame the main embroidery

flat lay view of various fabric pieces used for making the stitch book; front cover, back cover, pocket pieces

view of fabric pieces being assembled to form outside of stitch book; front cover, spine, and back cover
Adding an extra piece of fabric as a “spine” so it will close nicely and there will be room for fabric pages.
front and back covers with fusible interfacing
Front and back covers reinforced with fusible interfacing on the wrong side of the fabric.
close up view of closed stitched book featuring the side ribbon closure
Stitchbook opens and closes with another piece of ribbon 🙂

Originally, I had intended to make a tutorial post on how I made this stitch book, but there ended up being a little too much improvisation here and there, as well as mad scrambling around for fabric scraps. So I decided to save that for another time when I inevitably make another one, if it’s something that would interest you. Don’t hesitate to let me know in the comments!

flat lay view of closed stitchbook showing embroidered front cover. Stitchbook is surrounded by pinecone props and other dried flowers, as well as winded red floss and red autumn leaves
Finished dimensions are 8” x 9”, a little bit bigger than your average book or journal.

flat lay view of closed stitch book showing the back cover

Thanks so much for reading, and I hope this was at least a bit inspirational! 😊 I’m looking forward to filling my new little book with all sorts of fun stitches!

Fondly,

Redwork Embroidery: upcycling with this great 19th century technique

March 25, 2021      Anne      Leave a Comment

Ever since I started embroidery a few years ago, simple vintage designs featuring pretty flowers and helpful little animals have been one of my favourite go-tos. There is something so pleasing about their simplicity, and they’re so easy and quick to stitch. Perfect for beginners, and perfect for adding handstitched touches here and there without it taking too long. And that’s exactly what redwork embroidery is all about!

redwork embroidery vintage birds and hoop stitched in red thread

I’m the absolute worst when it comes to deciding what to embroider because there are just SO many options! I’m working on improving my own doodling and drawing skills to be able to stitch more of my own designs, but I do love working with vintage and historical designs – and what better place to browse for them than Pinterest? Which can easily end up taking hours since we all know Pinterest is a most wonderful vortex of endless ideas! And if choosing or coming up with a design wasn’t time-consuming already, choosing floss colours can take just as long!

An easy solution to that demanding conundrum is to opt for a single-colour technique like Redwork.

vintage teacup pincushion with close-up view of an assortment of red embroidery threads


What is Redwork?

As you might have guessed, rework is embroidery worked entirely in red thread, typically on white fabric (like linen or cotton). It emerged in the late 19th century,  when red was one of the only colourfast dyed threads available on the market. Easily accessible to people of all classes, it was often worked on schoolgirls’ samplers and embroidered on various home items such as pillows and tablecloths. Its popularity endured well into the 20th century and is still practiced today, especially on quilts and other patchwork. Redwork designs are typically very simple and full of old country charm. It features things like Sunbonnet Sues, flowers, fruits and vegetables, birds, and other cute little animals. Of course, there are no limits to what you can choose to embroider in redwork! Any design of your choice worked entirely in red thread can constitute redwork.

redwork embroidery vintage bird holding a piece of thread in its beak


Advantages of Redwork

Redwork is probably one of the most beginner-friendly types of embroidery out there. If you’re looking to start stitching, a redwork project would be an excellent place to start. Not only don’t you have to worry about colours, but redwork designs are usually all worked in basic outline stitches, using very few variations and little to no filling. Typical stitches used in redwork include the backstitch, split stitch, stem stitch, French knot, lazy-daisy, and sometimes a bit of satin stitch. You can easily decide to combine as few or as many as you want.


vintage bird design in redwork embroidery using splitstitch outlining technique (in progress)
Little bird outlined in splitstitch and “Wednesday” part of the title worked in backstitch.

Even for the seasoned embroiderer, the charm and simplicity of redwork lends itself beautifully to handmade accents for the kitchen or the sewing room. Plus, if you don’t worry about filling in any shape, it’s so quick to stitch!

lazy-daisy stitches to create flowers and leaves on embroidery hoop part of the design
I used the lazy-daisy stitch to create the flowers and leaves on the embroidery hoop design. The bird is done in splitstich and straight stitch (for the line details), and the needle and thread and done in backstitch.


Box Project

I had been wanting to try redwork for a while now, ever since falling in love with those cute, whimsical vintage patterns found all over the Internet. This box project was the perfect opportunity. In an effort to further organize my embroidery supplies, I decided to convert an empty Lindt chocolate box into a nice cozy home for them. As always, I spent an inordinate amount of time trying to decide what to embroider on the lid…in the end, I finally decided to try redwork thanks to my fabric choice.

finished project filled with various sewing supplies like lace, thread, embroidery hoop, floss


I have this bag of miscellaneous quilting cotton squares (used for anything except quilting, apparently) and I had just the right amount of the red gingham ones to go around the box to cover it. And what would look better paired with red gingham than redwork!


materials used to upcycle an old chocolate box: fabric, ruler, pencil, scissors, embroidered fabric to cover the lid
red gingham quilting squares and bird snips
box lid cover in progress - gingham squares sewn to main embroidered fabric


I chose a vintage “sew on Wednesday” design found via Pinterest, modified a little by adding my own quote. You can see the original here.

I worked most of it in backstitch and splitstich. I also used lazy-daisy for the flowers and some straight stitches here and there. It was super quick and easy! Using only one colour made it so much easier to re-thread the needle and carry the project with me for on-the-go stitching! I used two strands of DMC no. 816 for the entire design.


full view of redwork embroidery birds and embroidery hoop


I love filling blank spaces, so naturally I had to add a few other decorative touches, and found some little scraps of lace and the cutest buttons in the perfect shade of red.


close-up of red button and white lace used to decorate box lid corners

I sewed my little 3×3’’ gingham squares together to go around the lid, and then I stitched them to the redworked fabric for the lid top. More squares were sewn together to go around the bottom of the box, and hot glued them to the inside to hold in place.

red gingham squares going around the box
gingham fabric being hot glued around box


Turns out hot glue + fabric create bulk! No! Who would have thought?! Lo and behold, said bulk made the lid too small for the bottom and my box could no longer close…OOPS. Clearly I did not think this through. Guess that’s why they always told us not to mix fabric and glue in Costume Studies, lol!!

At least, I had started with the lid and the bottom was yet untouched. I was able to cut open one side and cut off a bit of the box bottom to make it smaller to fit under the lid. I can’t cut a straight line to save my life so it turned out crooked, but you can’t tell once the box is closed. And it closes so that’s all that matters!! 😉


finished box covered with fabric and redwork embroidery
Finished dimensions ended up being 6 1/2″ x 8 3/4″


Overall I’m very happy with it despite its imperfections. It makes a charming addition to my attempts at organizing, and my little birds remind me to stitch everyday 😊. It really is an easy project to do, the possibilities are endless and it’s a great way to recycle a perfectly good, sturdy box. Pick any fabric you like to cover it, and embroider or decorate it however you want! (wow, I really don’t make it easy to narrow down choices, do I??)


If you’re also interested in these fun vintage patterns, check out the fabulous collection over at French Knots, and follow my Pinterest board.

Let me know your thoughts on redwork in the comments! I hope you try it and are as charmed by it as I was.


Fondly,


Sources:

The book Simply Redwork by Mandy Shaw (published by David & Charles in the UK, 2014) and the article “Black and Blue and Red All Over” from the Embroidery Library website (last accessed March 25th, 2021) were consulted to learn more about the history of Redwork.

  • « Go to Previous Page
  • Page 1
  • Interim pages omitted …
  • Page 3
  • Page 4
  • Page 5
  • Page 6
  • Go to Next Page »

Primary Sidebar

Recent Posts

  • Floral Garden Bunting Project: a Wrap-Up on the 2023 Stitch-Along
  • Fall Floral Embroidery Pattern: Calendula Wreath
  • “Embroideries From an English Garden” by Carol Andrews – Book Review
  • Botanical Wreath Project: A Pattern for Each Month
  • 2023 Free Yearly Stitch-Along + Mini Needle-Painting Tutorial

Welcome

photo of Anne-Marie from The Diary of a Northern Belle

Hello I'm Anne! Welcome to my little corner of the Internet where I share my passion for hand embroidery with you through tutorials and patterns. I hope that you enjoy browsing and leave with some new inspiration!

Archives

  • January 2024
  • November 2023
  • August 2023
  • February 2023
  • January 2023
  • November 2022
  • October 2022
  • August 2022
  • July 2022
  • June 2022
  • May 2022
  • April 2022
  • March 2022
  • February 2022
  • January 2022
  • December 2021
  • November 2021
  • October 2021
  • September 2021
  • August 2021
  • July 2021
  • June 2021
  • May 2021
  • April 2021
  • March 2021

Blog Archive

Categories

~ Diary of a Northern Belle

Northern Belle Atelier is taking a break 🌸💖 Northern Belle Atelier is taking a break 🌸💖

Today (Feb. 09th) is the last day to place your order for any physical items in my shop (kits, needle minders, or finished works). I will be removing the listings over the weekend. PDF patterns will remain available for now, but they may be taken down at any time (so if you've had your eye on one, I suggest grabbing it before they're gone! 🥰).

I will also be tuning off Instagram in the coming days, but you can still reach me via my business emails if you need. My blog will remain up for the time being. 💕

Thank you ever so much for all the support you've shown my little business since I began sharing my embroidery here! It has meant so much to me to be able to do this, even if just in a small way. 💖🪡 Wishing you all some beautiful stitches ahead!

Anne
Xoxo
February Wreath aka "Victorian Valentine" pattern February Wreath aka "Victorian Valentine" pattern from last year 💖🌸🎀 I love this one so much and it's perfect for Valentine's Day coming up!

Find it in my Etsy shop 💜

(Sorry for the shaky video!!)
Needle minders will be leaving my shop soon!! 🍒 Needle minders will be leaving my shop soon!! 🍒 Snag a cute little fruity needle minder for your next embroidery project before February 9th! All remaining needle minders in my shop are 10% off until then 💕🍓🍒💛
✨️ IMPORTANT UPDATE ✨️ I will be disconti ✨️ IMPORTANT UPDATE ✨️

I will be discontinuing embroidery kits from my shop very soon, but I still have 2 left of this pretty summer wreath up for grabs!! 🌼🍓

I love this design and the kit comes with everything you need to make the project: two pieces of cotton fabric, thread card loaded with DMC floss, two needles, a good quality 6" hoop, and the PDF pattern! All presented in a handy folder to make it easy to keep everything together 🤍💛❤️

Visit my Etsy shop (linked in bio) if you're interested!! They won't be around for long!
Thank you so much for all the love on the Floral G Thank you so much for all the love on the Floral Garden bunting!! 💖🌷🌻 Following several inquiries from some of you who were missing some or all of the patterns from this project, I've decided to link them in a handy-dandy blog post for easier access! 💕 I've linked it via my bio if you want to have a look and get the patterns! I like to give my subscribers a bit of exclusivity, but since this project has now come to a close, I've decided to make it available to everyone. 🥰

I may also have taken that opportunity to write a bit about each flower, the inspiration behind the designs, and of course their meanings according to the Language of Flowers 😊🌿🌻 If that sounds of interest to you, read  the post to find out more! I've also linked some stitch tutorials that may be helpful. 

Happy stitching! 🎀🪡🌼

Anne
The Floral Garden stitch-along has come to a close The Floral Garden stitch-along has come to a close and the bunting has been sewn and hung! 🌻🌷🌿 what a joy it was to work on throughout the year, and I hope you've enjoyed it too! I'm thrilled with the final result 😍

Thank you so much for all the lovely comments and enthusiasm for this project. I've just sent the final instructions + bunting template to my email subscribers 💌 it isn't too late if you'd like to give this project a try - you can sign-up via the link in my bio and receive the links to all 12 floral motifs from last year + the instructions for the bunting!! 💕

The embroideries are beginner-friendly and perfect if you want to try a bit of needle-painting, and the bunting part is quite easy and quick to put together (compared to last year's mini-quilt haha!) 🌷💕🌿

Happy stitching!!
Winter Fox 🦊🤍🌲 I think this makes the fir Winter Fox 🦊🤍🌲 I think this makes the first completed embroidery for 2024! Absolutely loved working on this and love the mix of watercolor with embroidery! Can't get enough of the little pinecones 🤎
Follow on Instagram

Copyright The Diary of a Northern Belle © 2025 · Wordpress Theme by Hello Yay!

We use cookies on our website to give you the most relevant experience by remembering your preferences and repeat visits. By clicking “Accept”, you consent to the use of ALL the cookies.
Cookie settingsACCEPT REJECT
Manage consent

Privacy Overview

This website uses cookies to improve your experience while you navigate through the website. Out of these, the cookies that are categorized as necessary are stored on your browser as they are essential for the working of basic functionalities of the website. We also use third-party cookies that help us analyze and understand how you use this website. These cookies will be stored in your browser only with your consent. You also have the option to opt-out of these cookies. But opting out of some of these cookies may affect your browsing experience.
Necessary
Always Enabled
Necessary cookies are absolutely essential for the website to function properly. These cookies ensure basic functionalities and security features of the website, anonymously.
CookieDurationDescription
__cfduid1 monthThe cookie is used by cdn services like CloudFare to identify individual clients behind a shared IP address and apply security settings on a per-client basis. It does not correspond to any user ID in the web application and does not store any personally identifiable information.
cookielawinfo-checbox-analytics11 monthsThis cookie is set by GDPR Cookie Consent plugin. The cookie is used to store the user consent for the cookies in the category "Analytics".
cookielawinfo-checbox-functional11 monthsThe cookie is set by GDPR cookie consent to record the user consent for the cookies in the category "Functional".
cookielawinfo-checbox-others11 monthsThis cookie is set by GDPR Cookie Consent plugin. The cookie is used to store the user consent for the cookies in the category "Other.
cookielawinfo-checkbox-necessary11 monthsThis cookie is set by GDPR Cookie Consent plugin. The cookies is used to store the user consent for the cookies in the category "Necessary".
cookielawinfo-checkbox-performance11 monthsThis cookie is set by GDPR Cookie Consent plugin. The cookie is used to store the user consent for the cookies in the category "Performance".
viewed_cookie_policy11 monthsThe cookie is set by the GDPR Cookie Consent plugin and is used to store whether or not user has consented to the use of cookies. It does not store any personal data.
Functional
Functional cookies help to perform certain functionalities like sharing the content of the website on social media platforms, collect feedbacks, and other third-party features.
Performance
Performance cookies are used to understand and analyze the key performance indexes of the website which helps in delivering a better user experience for the visitors.
Analytics
Analytical cookies are used to understand how visitors interact with the website. These cookies help provide information on metrics the number of visitors, bounce rate, traffic source, etc.
Advertisement
Advertisement cookies are used to provide visitors with relevant ads and marketing campaigns. These cookies track visitors across websites and collect information to provide customized ads.
Others
Other uncategorized cookies are those that are being analyzed and have not been classified into a category as yet.
SAVE & ACCEPT
Powered by CookieYes Logo